Category Archive proxmox

How to Pass-through PCIe NICs with Proxmox VE on Intel and AMD

Proxmox VE Web GUI Pick NIC To Pass Through

A quick one today is the super-simple tutorial for getting NICs passed through to virtual machines on Promxox VE. Passing-through NICs avoid the hypervisor overhead and also can help with compatibility issues using virtual NICs and some firewall appliances like pfSense and OPNsense. The downside is that unless the NICs support SR-IOV, they most likely will not be shared devices in this configuration.

Step 1: BIOS Setup

The first thing one needs to do is to turn on the IOMMU feature on your system. For this, the CPU and the platform need to support the feature. These days, most platforms will support IOMMU, but some older platforms do not. On Intel platforms, this is called “VT-d”. That stands for Intel Virtualization Technology for Directed I/O (VT-d.)

Enable Intel VT D To Get IOMMU Working

On AMD platforms you will likely see AMD-Vi as the option. Sometimes in different system firmware, you will see IOMMU. These are the options you want to enable.

Of course, since this is Proxmox VE, you will want to ensure your basic virtualization is on as well while you are in the BIOS. Also, since it is going to likely be a main focus for people using this guide, if you are making a firewall/ router on the machine, we usually suggest setting the On AC Power setting to “Always on” or “Last state” so that in the event of a power failure, your network comes up immediately.

Next, we need to determine if we are using GRUB or systemd as the bootloader.

Step 2: Determine if you are Using GRUB or systemd

This is a newer step, but if you install a recent version of Proxmox VE, and are using ZFS as the root (this may expand in the future) you likely are using systemd not GRUB. After installation, use this command to determine which you are using:

efibootmgr -v

If you see something like “File(\EFI\SYSTEMD\SYSTEMD-BOOTX64.EFI)” then you are using systemd, not GRUB.

Another giveaway is when you boot, if you see a blue screen with GRUB and a number of options just before going into the OS, then you are using GRUB. If you see something like this, you are using systemd:

Proxmox VE Systemd Boot Menu

This is important because many older guides are using GRUB, but if you are using systemd, and follow the GRUB instructions, you will not enable IOMMU needed for NIC pass-through.

Step 3a: Enable IOMMU using GRUB

If you have GRUB, and most installations today will, then you will need to edit your configuration file:

nano /etc/default/grub

For Intel CPUs add quiet intel_iommu=on:

GRUB_CMDLINE_LINUX_DEFAULT="quiet intel_iommu=on"

For AMD CPUs add quiet amd_iommu=on:

GRUB_CMDLINE_LINUX_DEFAULT="quiet amd_iommu=on"

Here is a screenshot with the intel line to show you where to put it:

Proxmox VE Nano Grub Quiet Intel Iommu On

Optionally, one can also add IOMMU PT mode. PT mode improves the performance of other PCIe devices in the system when passthrough is being used. This works on Intel and AMD CPUs and is iommu=pt. Here is the AMD version, of what would be added, and we will have an Intel screenshot following:

GRUB_CMDLINE_LINUX_DEFAULT="quiet amd_iommu=on iommu=pt"

Here is the screenshot of where this goes:

Proxmox VE Nano Grub Quiet Intel Iommu On Iommu Pt

Remember to save and exit.

Now we need to update GRUB:

update-grub

Now to go Step 4.

Step 3a: Enable IOMMU using systemd

If in Step 2 you found you were using systemd, then adding bits to GRUB will not work. Instead, here is what to do:

nano /etc/kernel/cmdline

For Intel CPUs add:

quiet intel_iommu=on

For AMD CPUs add:

quiet amd_iommu=on

Here is a screenshot of where to add this using the Intel version:

Proxmox VE Systemd Quiet Intel_iommu=on

Optionally, one can also add IOMMU PT mode. This works on Intel and AMD CPUs and is iommu=pt. Here is the AMD version, of what would be added, and we will have an Intel screenshot following:

quiet amd_iommu=on iommu=pt

Here is the Intel screenshot:

Proxmox VE Systemd Quiet Intel_iommu=on Iommu=pt

Now we need to refresh our boot tool.

proxmox-boot-tool refresh

Now go to Step 4.

Step 4: Add Modules

Many will immediately reboot after the above is done, and it is probably a good practice. Usually, I like to add modules just to save time. If you are more conservative, reboot, then do this step. Next, you will want to add modules by editing:

nano /etc/modules

In that file you will want to add:

vfio
vfio_iommu_type1
vfio_pci
vfio_virqfd

Here is what it should look like:

Proxmox VE NIC Pass Through Etc Modules Additions
Proxmox VE NIC Pass-Through Etc Modules Additions

Next, you can reboot.

Step 5: Reboot

This is a big enough change that you will want to reboot next. With PVE, a tip we have is to reboot often when setting up the base system. You do not want to spend hours building a configuration then find out it does not boot and you are unsure of why.

We will quickly note that we condensed the above a bit for more modern systems. If something fails in the verify step below, you may want to reboot before adding modules instead, and also not turn on PT mode before rebooting.

Step 7: Verify Everything is Working

This is the command you will want to use:

dmesg | grep -e DMAR -e IOMMU

Depending on the system, which options you have, and so forth, a lot of the output is going to change here. What you are looking for is the line highlighted in the screenshot DMAR: IOMMU enabled:

Proxmox VE IOMMU Enabled

If you have that, you are likely in good shape.

Step 7: Configure Proxmox VE VMs to Use NICs

For this, we are using a little box very similar to the Inexpensive 4x 2.5GbE Fanless Router Firewall Box Review. It is essentially the same, just a different version of that box. One of the nice features is that each NIC is its own i225-V and we can pass through each individual NIC to a VM. Here is a screenshot from an upcoming video we have:

Proxmox VE Web GUI Pick NIC To Pass Through
Proxmox VE Web GUI Pick NIC To Pass-Through

In the old days, adding a pass-through NIC to a VM was done via CLI editing. Now, Proxmox pulls the PCIe device ID and then also the device vendor and name. This makes it very easy to pick NICs in a system. One point that is nice about many of the onboard NICs is that the physical ordering as the NICs are labeled on the system should mean that we have sequential MAC addresses and PCIe IDs. In the above 0000:01:00.0 is the first NIC (ETH0). The device 0000:02:00.0 is the second, and so forth.

Hunsn 4 Port 2.5GbE I225 Intel J4125 Firewall Box NIC Ports

At this point, you are already done. You can see we have this working on both OPNsense and pfSense and the process is very similar. The nice thing is that by doing this, pfSense/ OPNsense have direct access to the NICs instead of using a virtualized NIC device.

A Few Notes on IOMMU with pfSense and OPNsense

After these NICs are assigned there are a few key considerations that are important to keep in mind:

  • Using a pass-through NIC will make it so the VM will not live migrate. If a VM expects a physical NIC at a PCIe location, and it does not get it, that will be an issue.
  • Conceptually, there is a more advanced feature called SR-IOV that allows you to pass through a NIC to multiple devices. For lower-end i210 and i225-V NICs that we commonly see in pfSense and OPNsense appliances, you will be conceptually dedicating the NIC to the VM. That means, another VM cannot use the NIC. Here is an example where we have the pfSense VM (600) using a NIC that is also assigned to the OPNsense NIC. We get an error trying to start OPNsense. The Proxmox VE GUI will allow you to configure pass-through on both VMs if they are off, but only one can be on and active with the dedicated NIC at a time.
Proxmox VE Web GUI NIC Being Assigned To A Second VM
Proxmox VE Web GUI NIC Being Assigned To A Second VM for OPNsense when it is already assigned to pfSense
  • Older hardware may not have IOMMU capabilities. Newer hardware has both IOMMU and ACS, so most newer platforms make it easy to separate PCIe devices and dedicate them to VMs. On older hardware, sometimes how PCIe devices are grouped causes issues if you want to, as in this example, pass-through NICs separately to different VMs.
  • You can utilize both virtual NICs on bridges along with dedicated pass-through NICs in the same VM.
  • At 1GbE speeds, pass-through is not as big of a difference compared to using virtualized NICs. At 25GbE/ 100GbE speeds, it becomes a very large difference.
  • When we discuss DPUs, one of the key differences is that the DPU can handle features like bridging virtual network ports to physical high-speed ports and that happens all on the DPU rather than the host CPU.
  • This is an area where it takes longer to setup than a bare-metal installation, and it adds complexity to a pfSense or OPNsense installation. The benefit one gets is that doing things like reboots is usually much faster in the virtual machine. One can also snapshot the pfSense or OPNsense image in the event one makes a breaking change.
  • We suggest having at least one more NIC in the system for Proxmox VE management and other VM features. If one uses pass-through for all NICs to firewall VMs, then there will not be a system NIC.

How To Create Proxmox Containers From Proxmox Web UI Dashboard

Create And Manage Linux Containers From Proxmox VE Web Dashboard

In this tutorial, we will discuss a brief overview about Linux containers and its use cases. Then we will move on to see how to list available container templates from Proxmox web dashboard, download a container template and finally create Proxmox containers using the downloaded container template from Proxmox dashboard.

If you haven’t installed Proxmox VE yet, refer the following guides.

What Is A Linux Container?

Linux Container (shortly LXC) is an OS-level virtualization method for running multiple isolated applications sharing an underlying Linux kernel. To put this in other words, Containers will use the same kernel of host system that they run on.

A container consists of one or more processes (generally running with reduced privileges) having shared visibility into kernel objects and a common share of host resources.

Shared visibility into kernel objects is governed by namespaces, which prevent processes in one container from interacting with kernel objects, such as files or processes, in an other container.

Resource allocation is governed by cgroups (control groups), provided by the kernel to limit and prioritize resource usage. An LXC container is a set of processes sharing the same collection of namespaces and cgroups.

Containers are very useful to develop, deploy, and test modern distributed apps and microservices that can operate in isolated execution environments on same host systems.

Containers are in high demand because they are lightweight alternatives to fully virtualized machines (VMs). The operating and running costs of containers are very low when compared to VMs.

Create Proxmox Containers From Proxmox Web Dashboard

Proxmox uses Linux Containers (LXC) as its underlying container technology.

We can create and containers from Proxmox VE graphical web user interface (GUI) or from commandline using Proxmox Container Toolkit (pct).

In this tutorial, we will see how to create and manage Proxmox containers from Proxmox web dashboard.

Step 1 – Login To Proxmox Web User Interface

Open the web browser and navigate to https://proxmox-IP-address:8006/ URL. You will be pleased with the Proxmox login page. Enter the username (root) and its password.
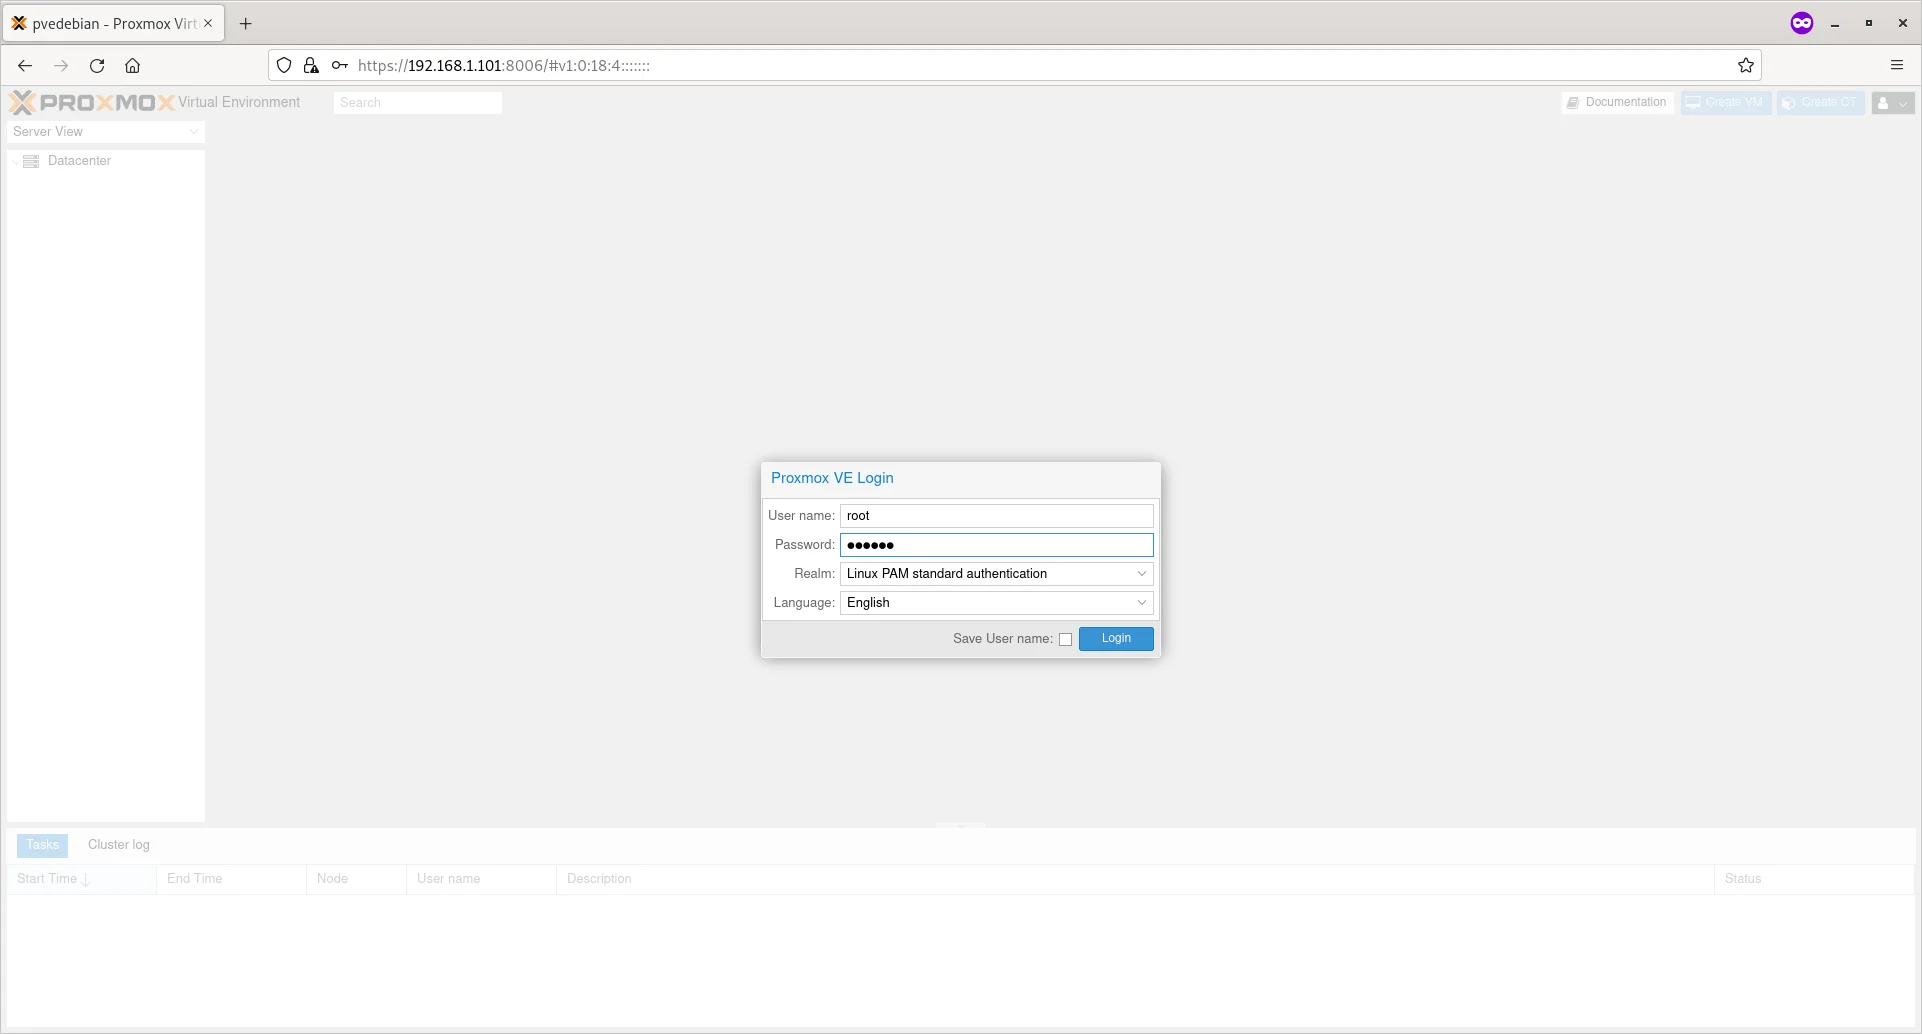
Login To Proxmox Web Dashboard

Step 2 – Download Container Images

Container images (also known as templates, or appliances) is a tar archive that is bundled with everything to run a container.

Proxmox provides various templates for popular Linux distributions. As of writing this guide, you can download the Container templates for the following Linux distributions from Proxmox VE official repositories.

  • Alpine Linux
  • Arch Linux
  • CentOS / CentOS Stream / AlmaLinux / Rocky Linux
  • Debian
  • Devuan
  • Fedora
  • Gentoo
  • openSUSE
  • Ubuntu

You can also download various ready-made appliances from Turnkey Linux website.

Turnkey Linux is an open source project that developing a free virtual appliance library that features the very best server-oriented open source software. Each virtual appliance is optimized for ease of use and can be deployed in just a few minutes on bare metal, a virtual machine and in the cloud.

For the purpose of this guide, i am going to use Debian 11 standard template.

Click on the small arrow button besides your Proxmox host name to expand it. And click on the storage named ‘local‘. You will see the following screen.
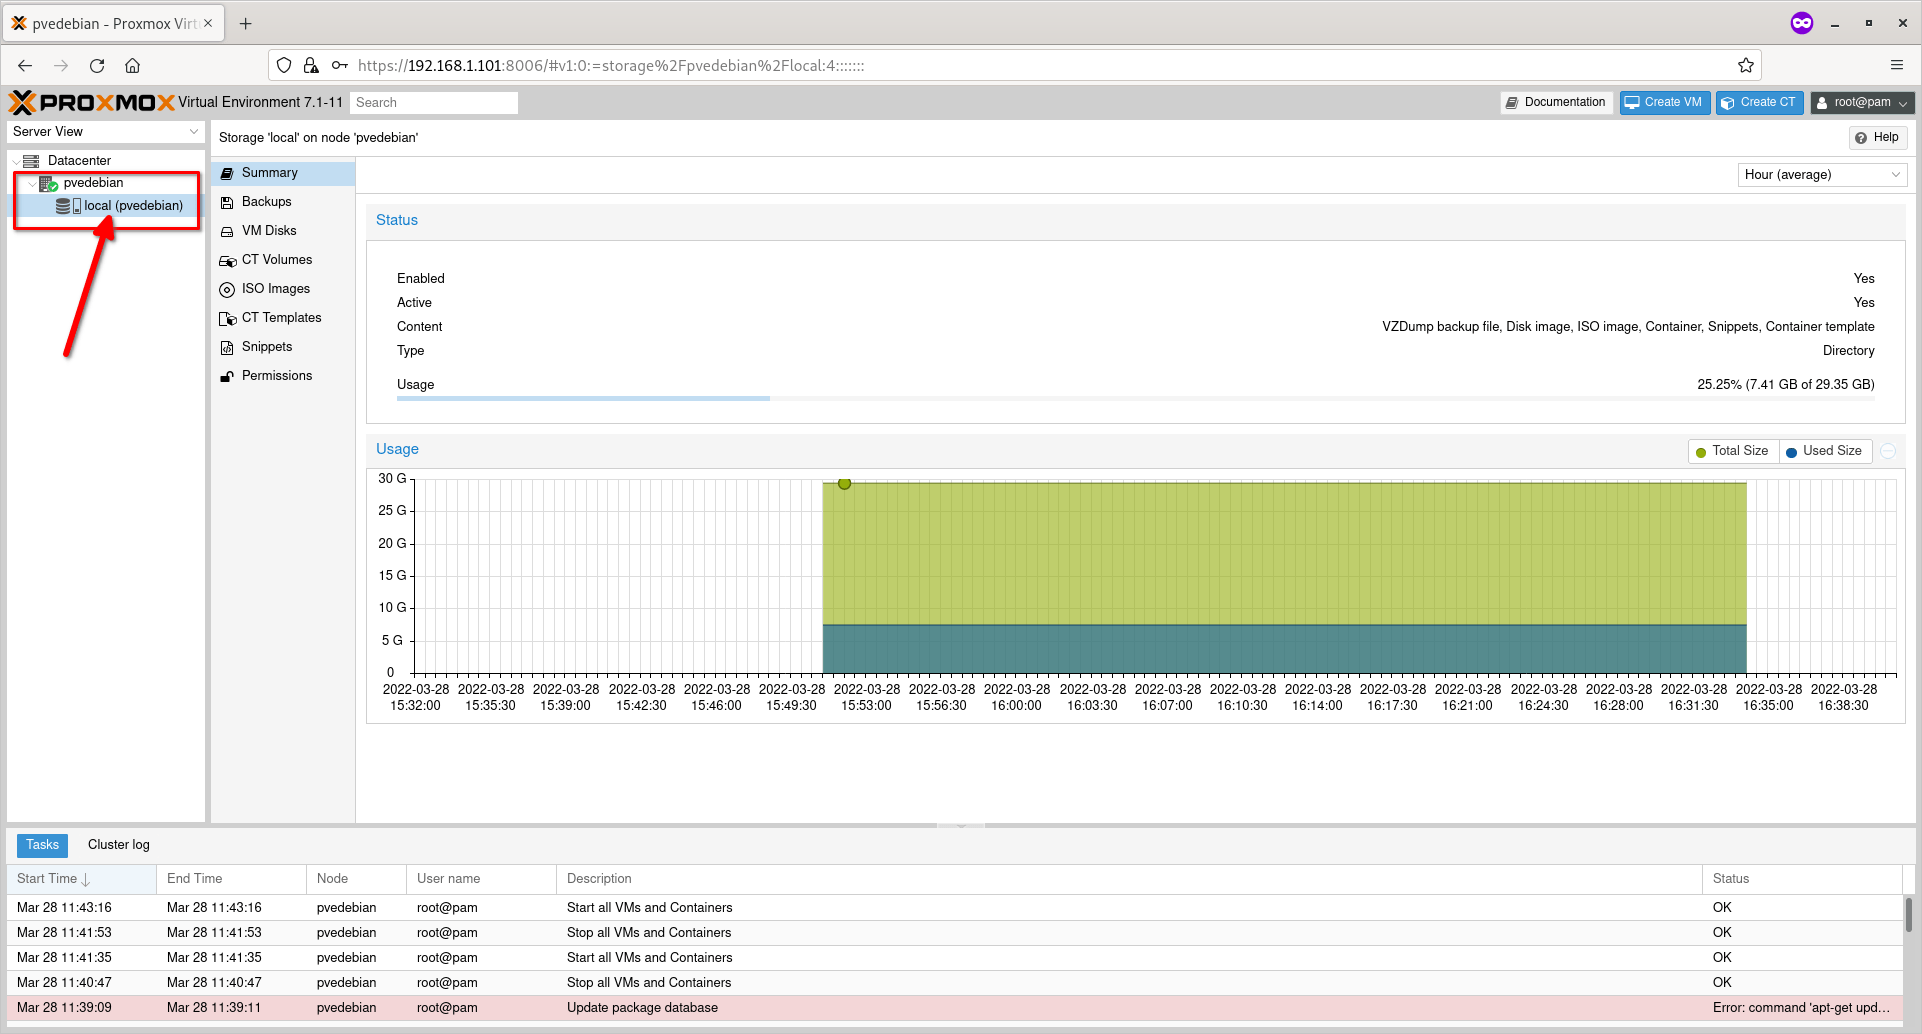
Click On Storage 'local' On Proxmox  System
Click On Storage ‘local’ On Proxmox System

Click on ‘CT Templates’ option and then click ‘templates’ button.
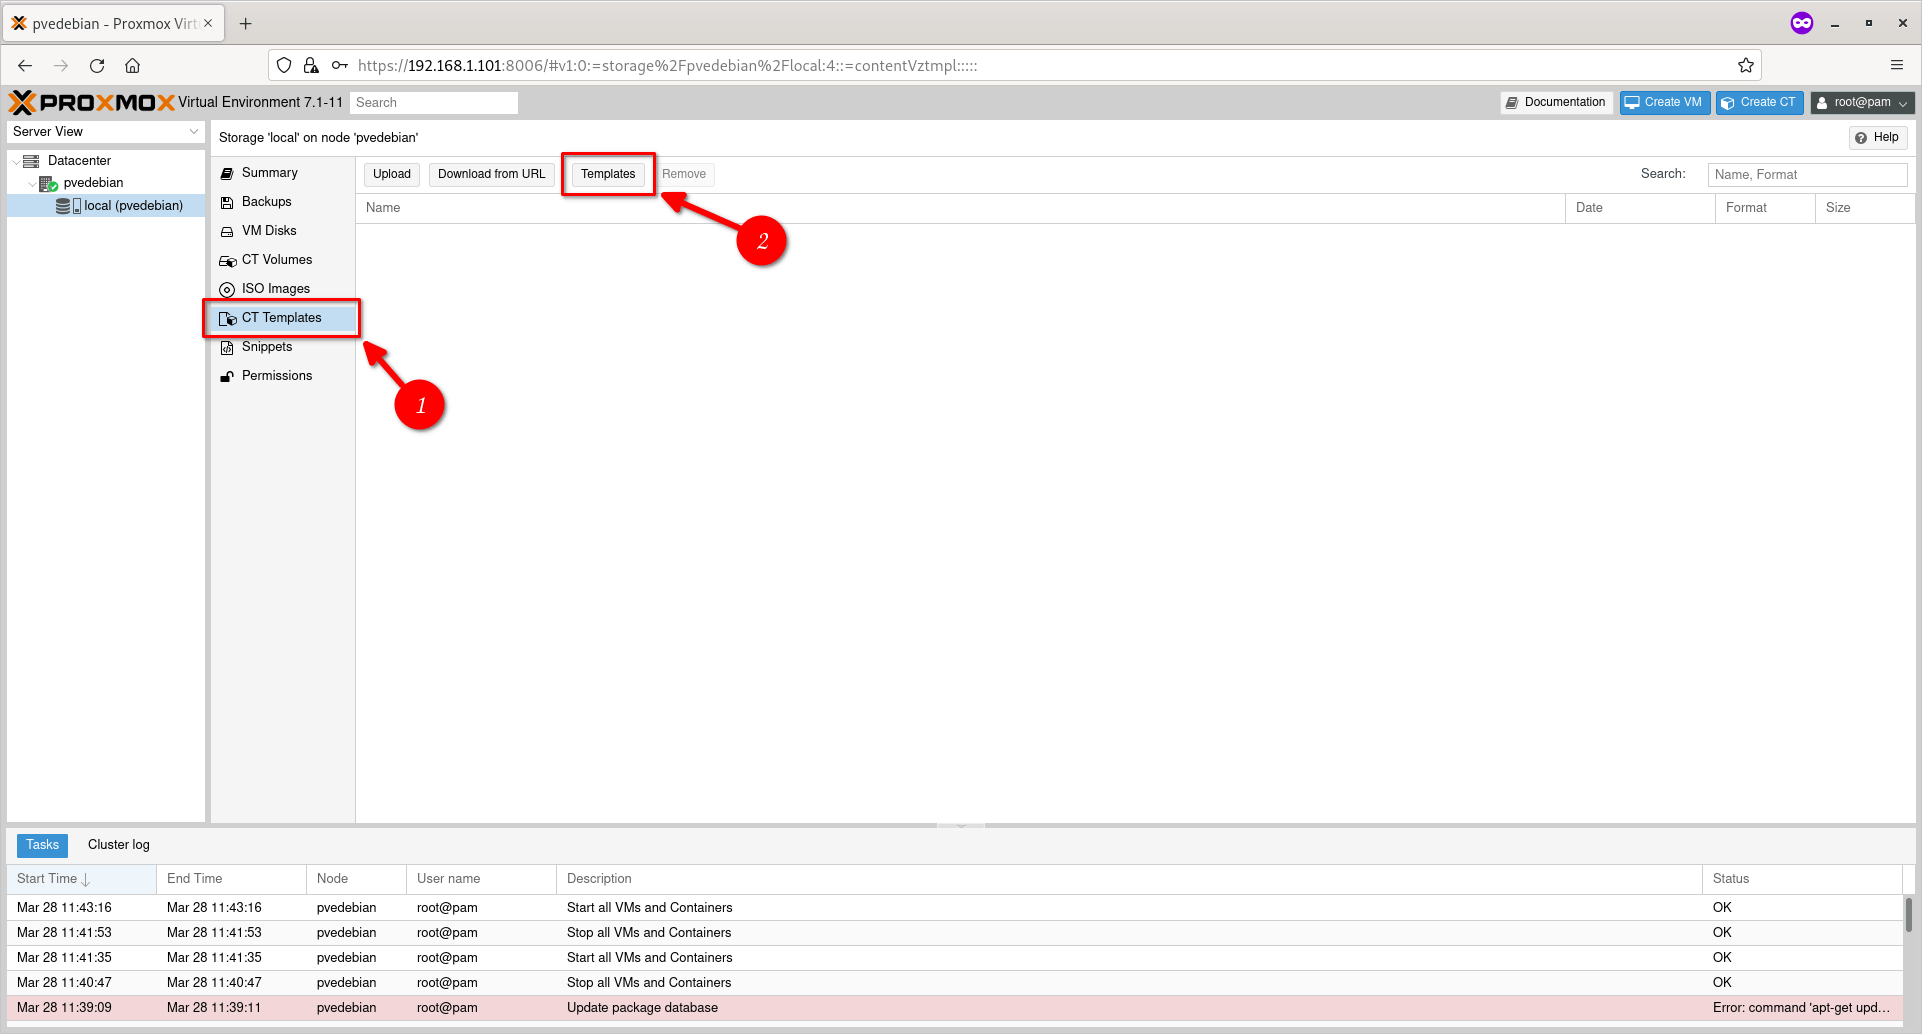
Click On CT Templates Option

You can also click ‘Upload’ button to upload an already downloaded template or choose ‘Download from URL’ button to download the template from a specific URL. I don’t have any templates on my local disk, so I chose ‘Templates’ button.

Choose the Container template of your choice and hit Download button.
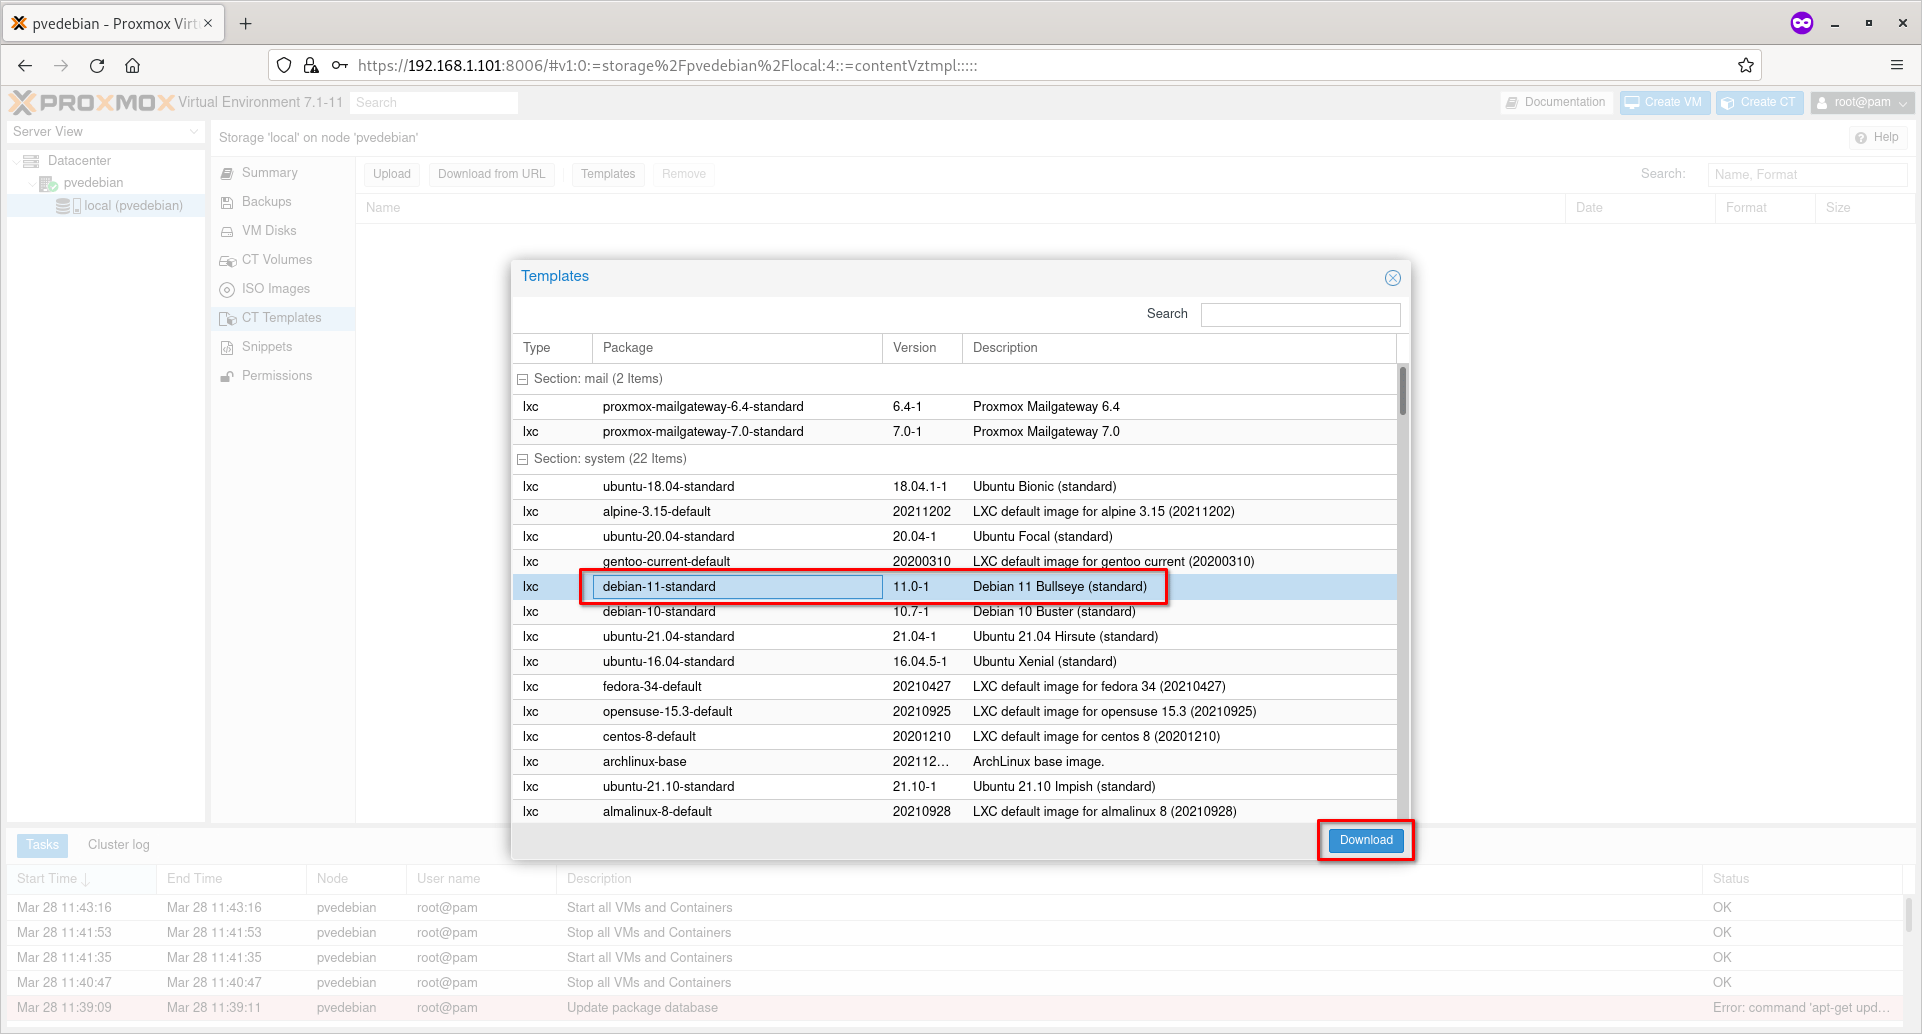
Download Debian Container Template

Now the selected the template will be downloaded and saved on /var/lib/vz/template/cache/ directory in your Proxmox host.

Once the template is downloaded, click the close button.
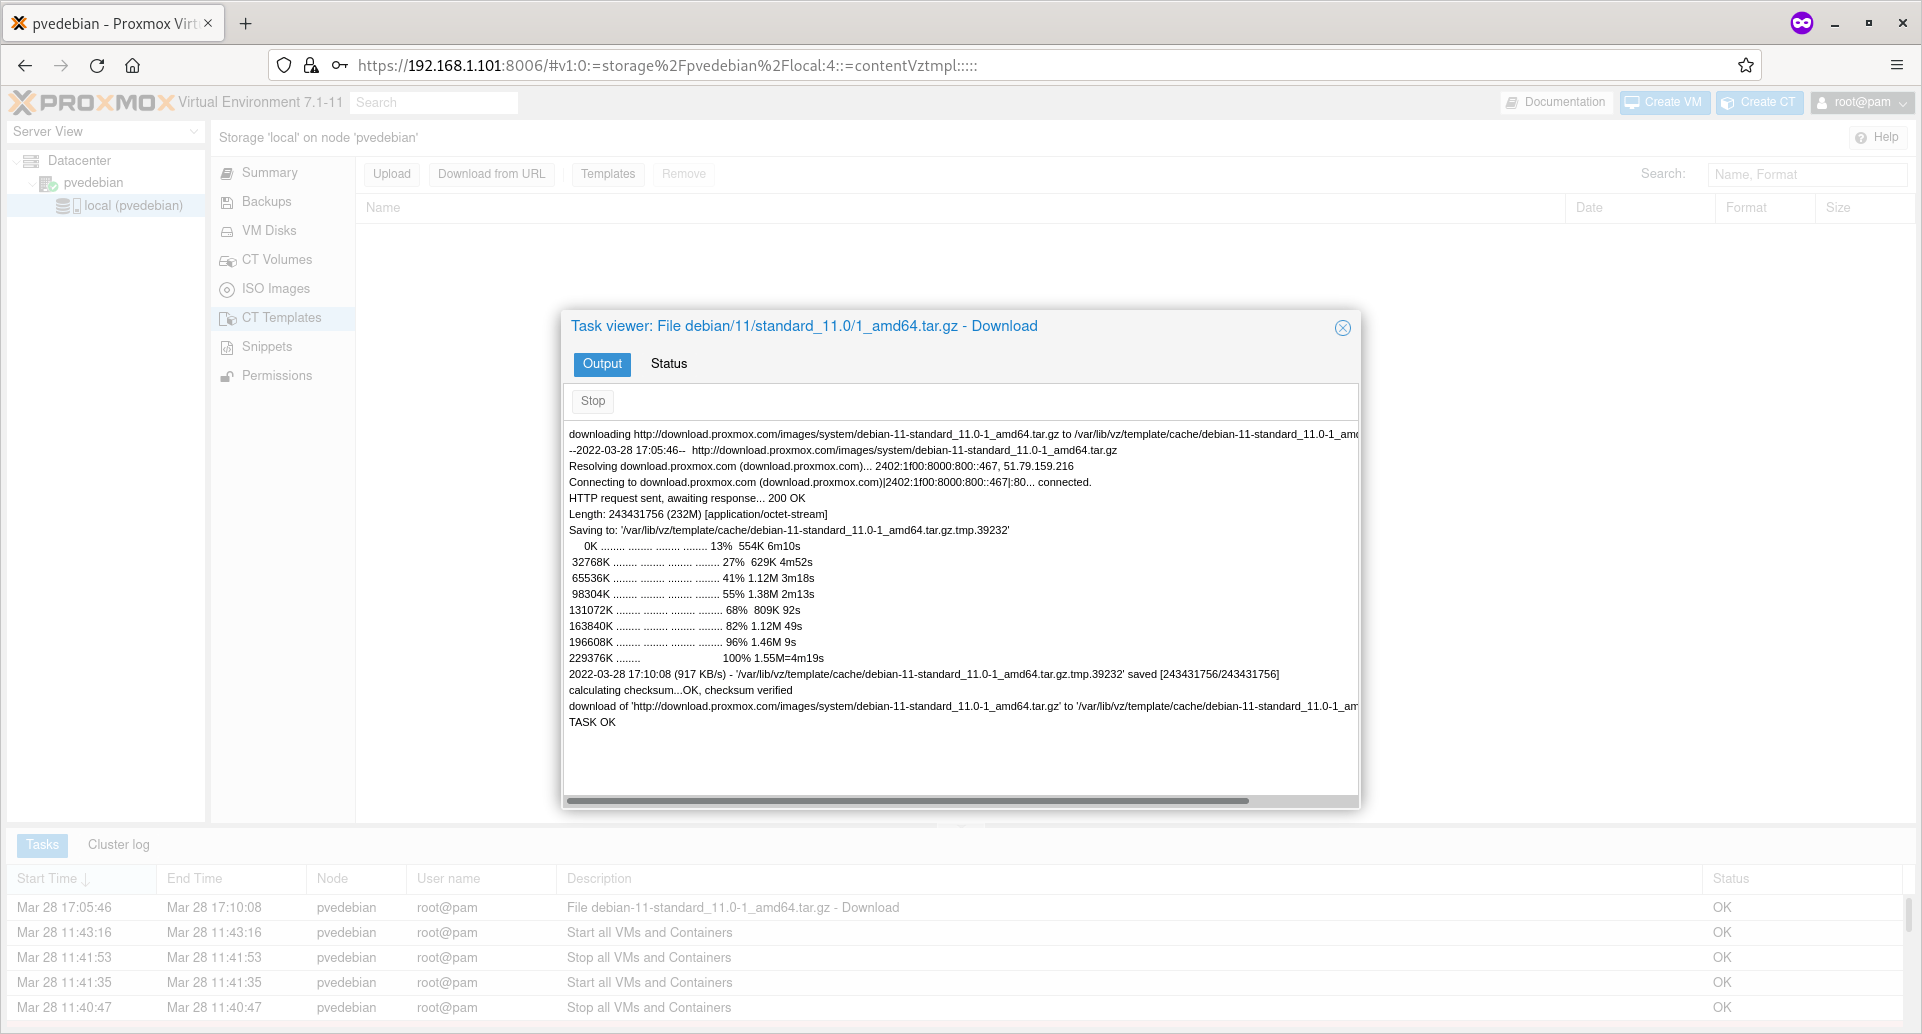
Debian Template Downloaded

You will now see the list of downloaded templates under ‘CT Templates’ section.
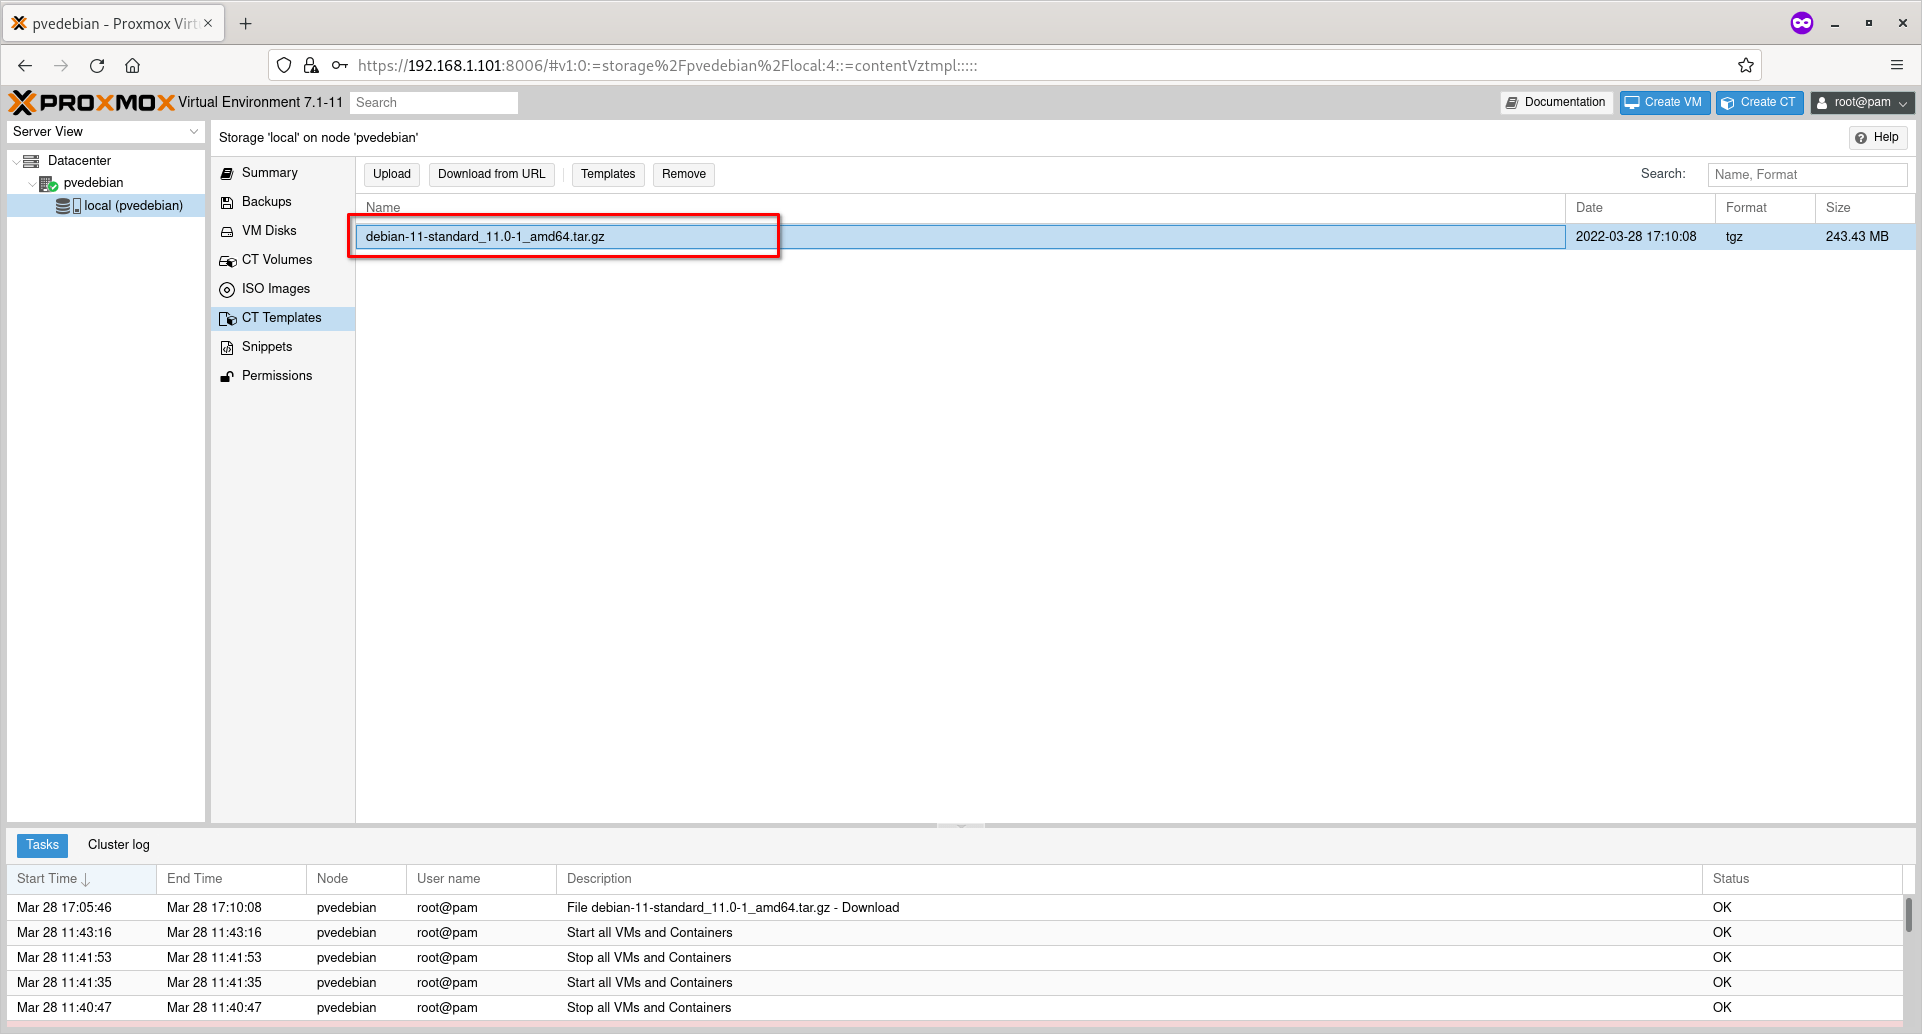
Available Container Templates In Proxmox

Now it is time to create the containers using a downloaded template.

Step 3 – Create Proxmox Container

Right click on the Proxmox node and click “Create CT“. In my case, pvedebian is the name of my Proxmox host.
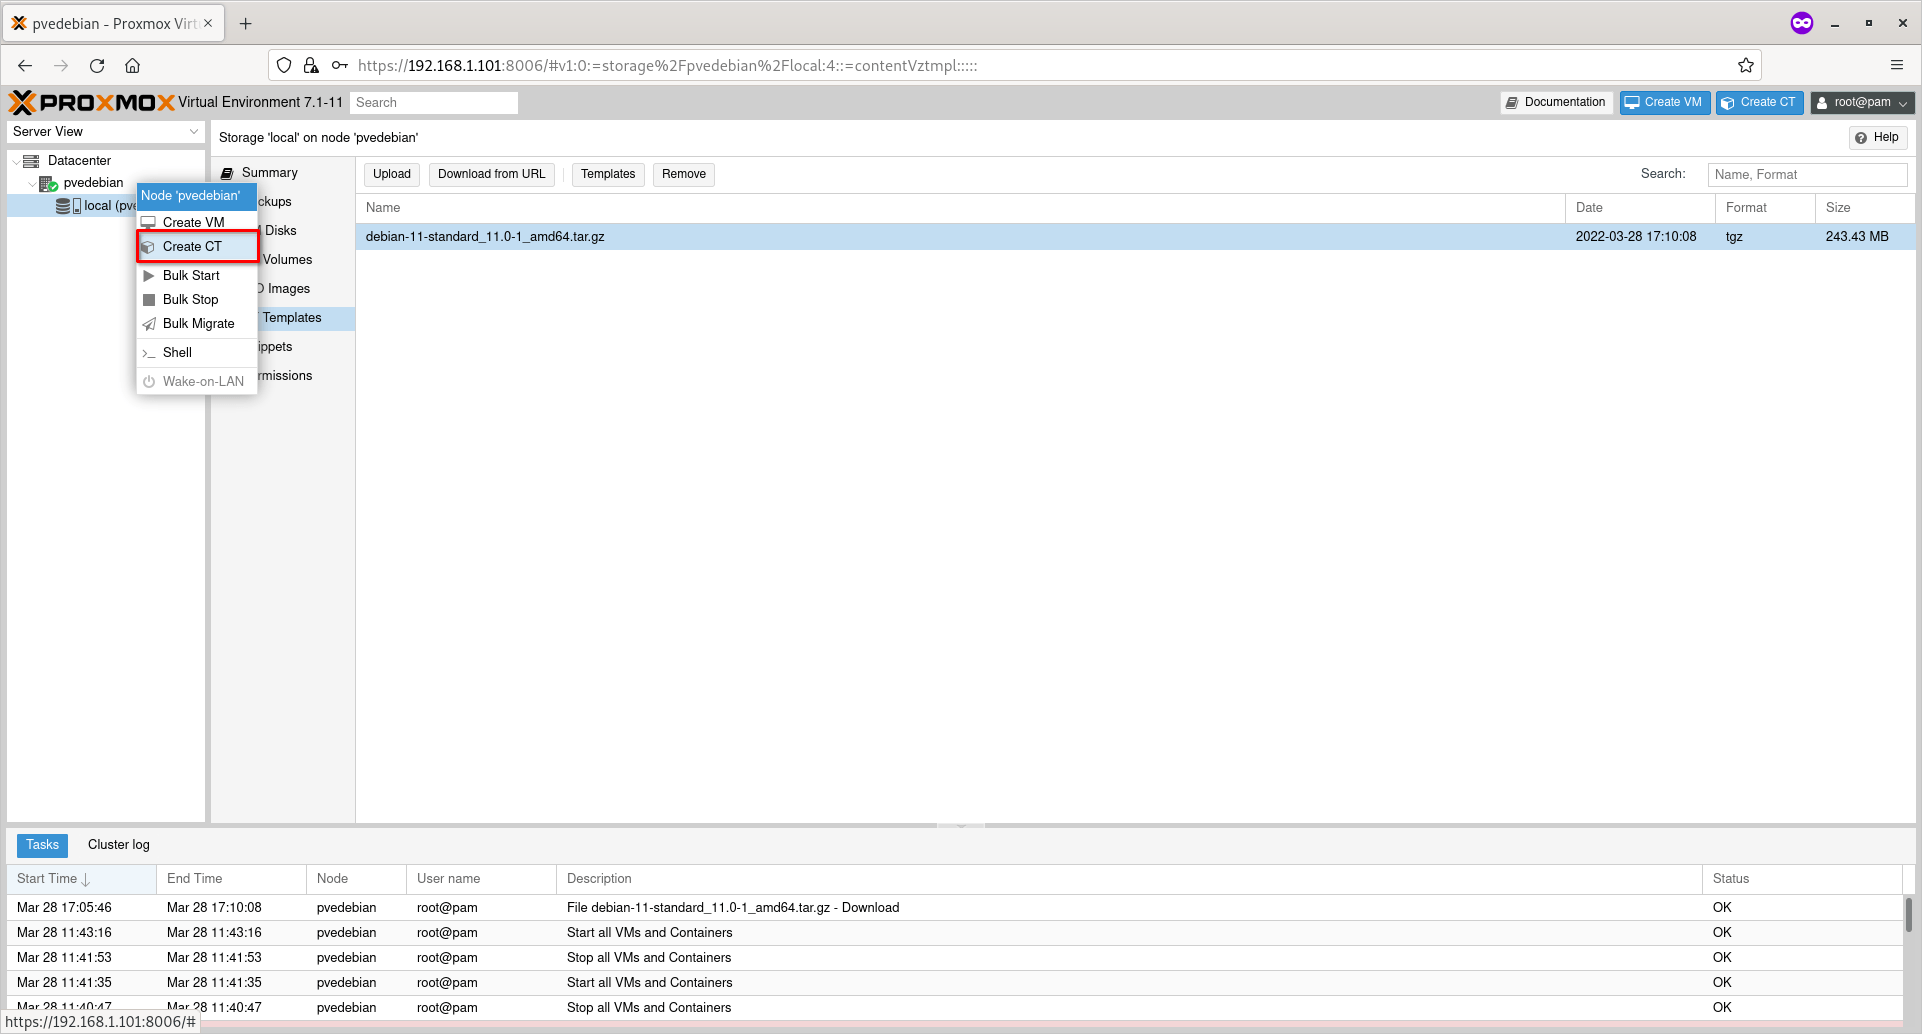
Create Proxmox Container
Create New Proxmox Container

Enter the name of the container and password for the ‘root’ user. You should not use underscore or space or any special characters for the hostname. Click Next to continue.
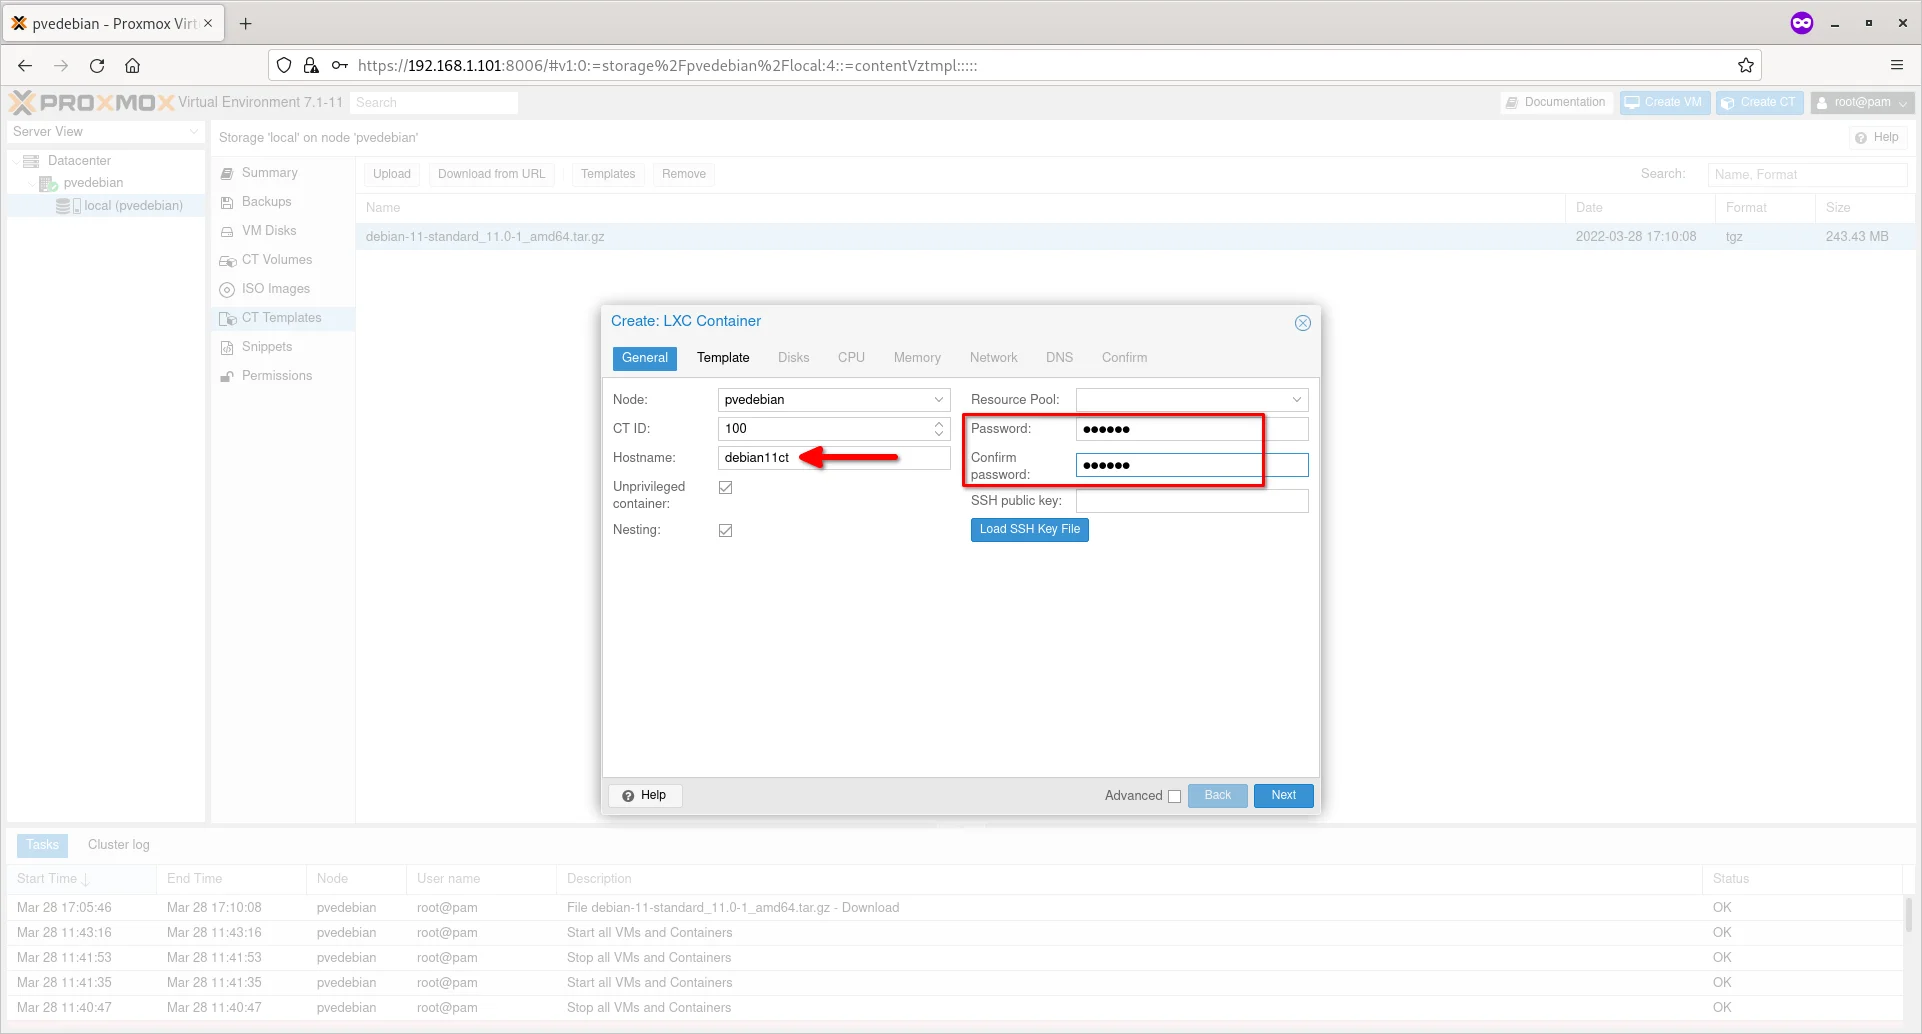
Enter Container Hostname And Root Password

Choose the Container template from the ‘Template’ drop-down box and click Next.
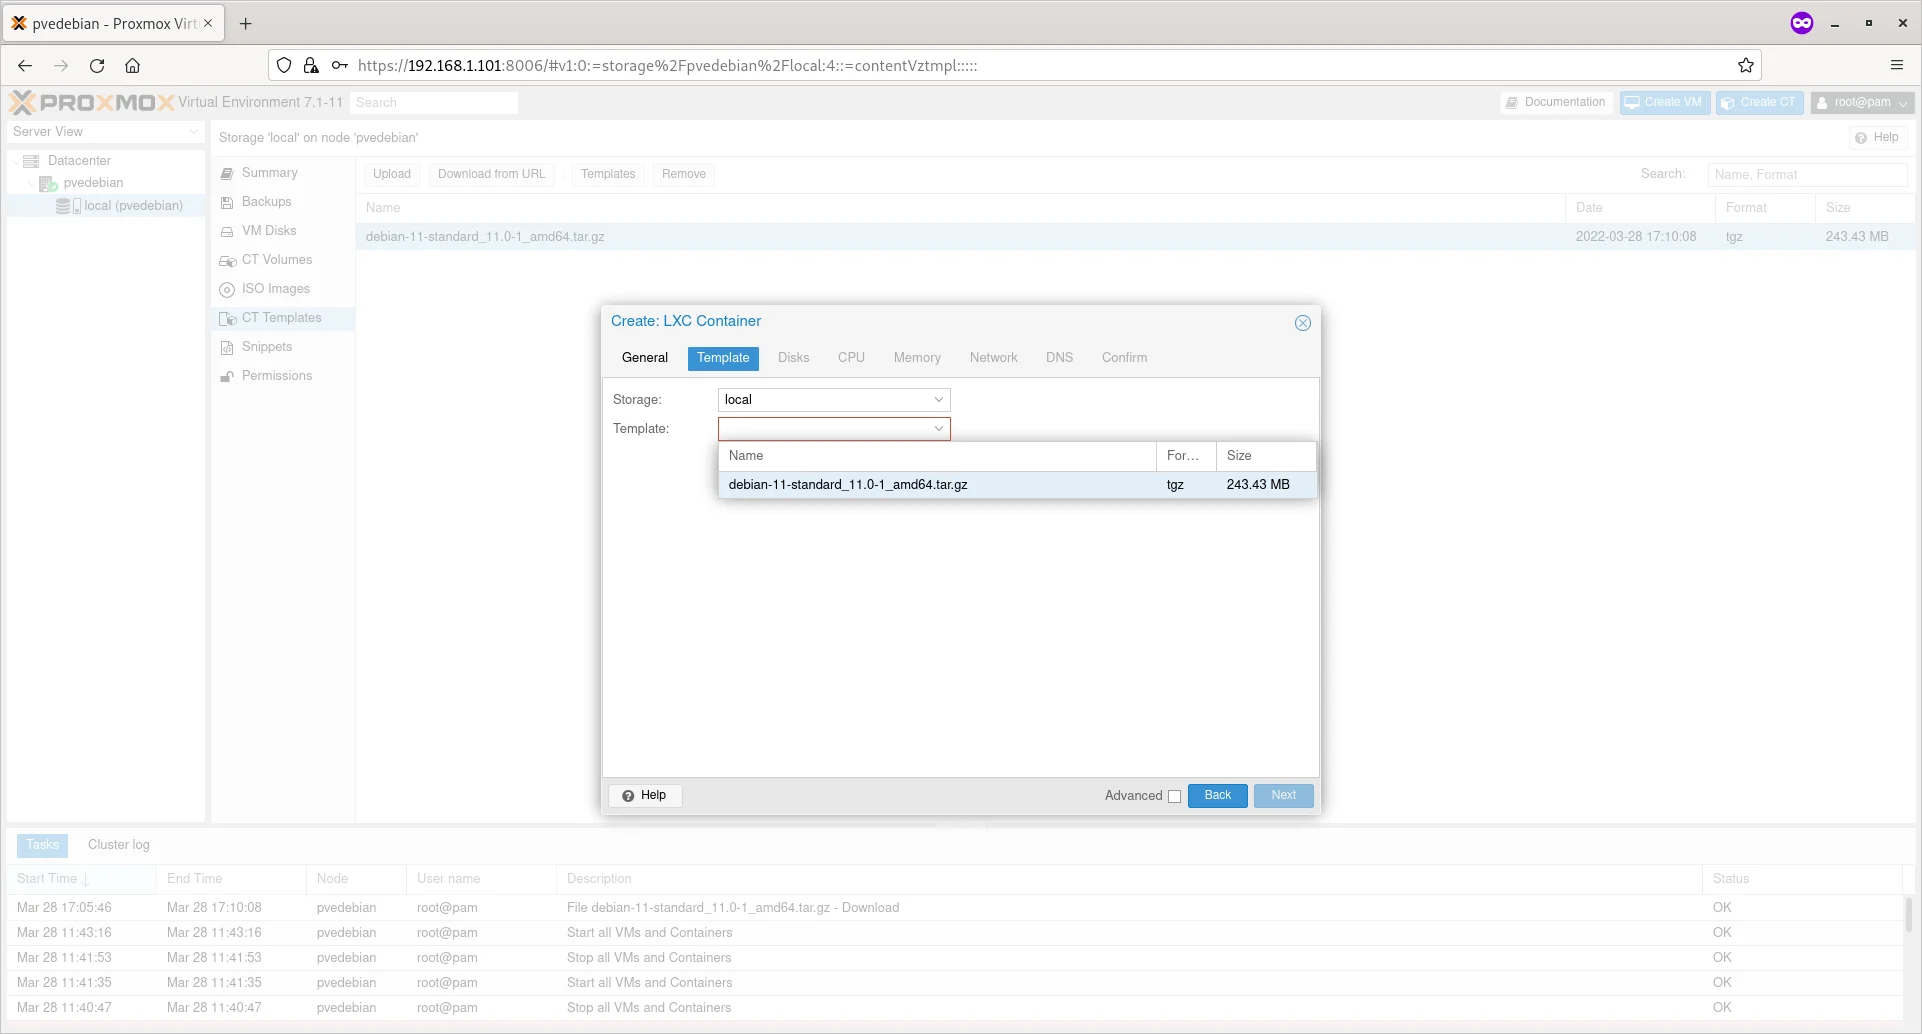
Choose Container Template

Enter the disk size for the new container and click Next.
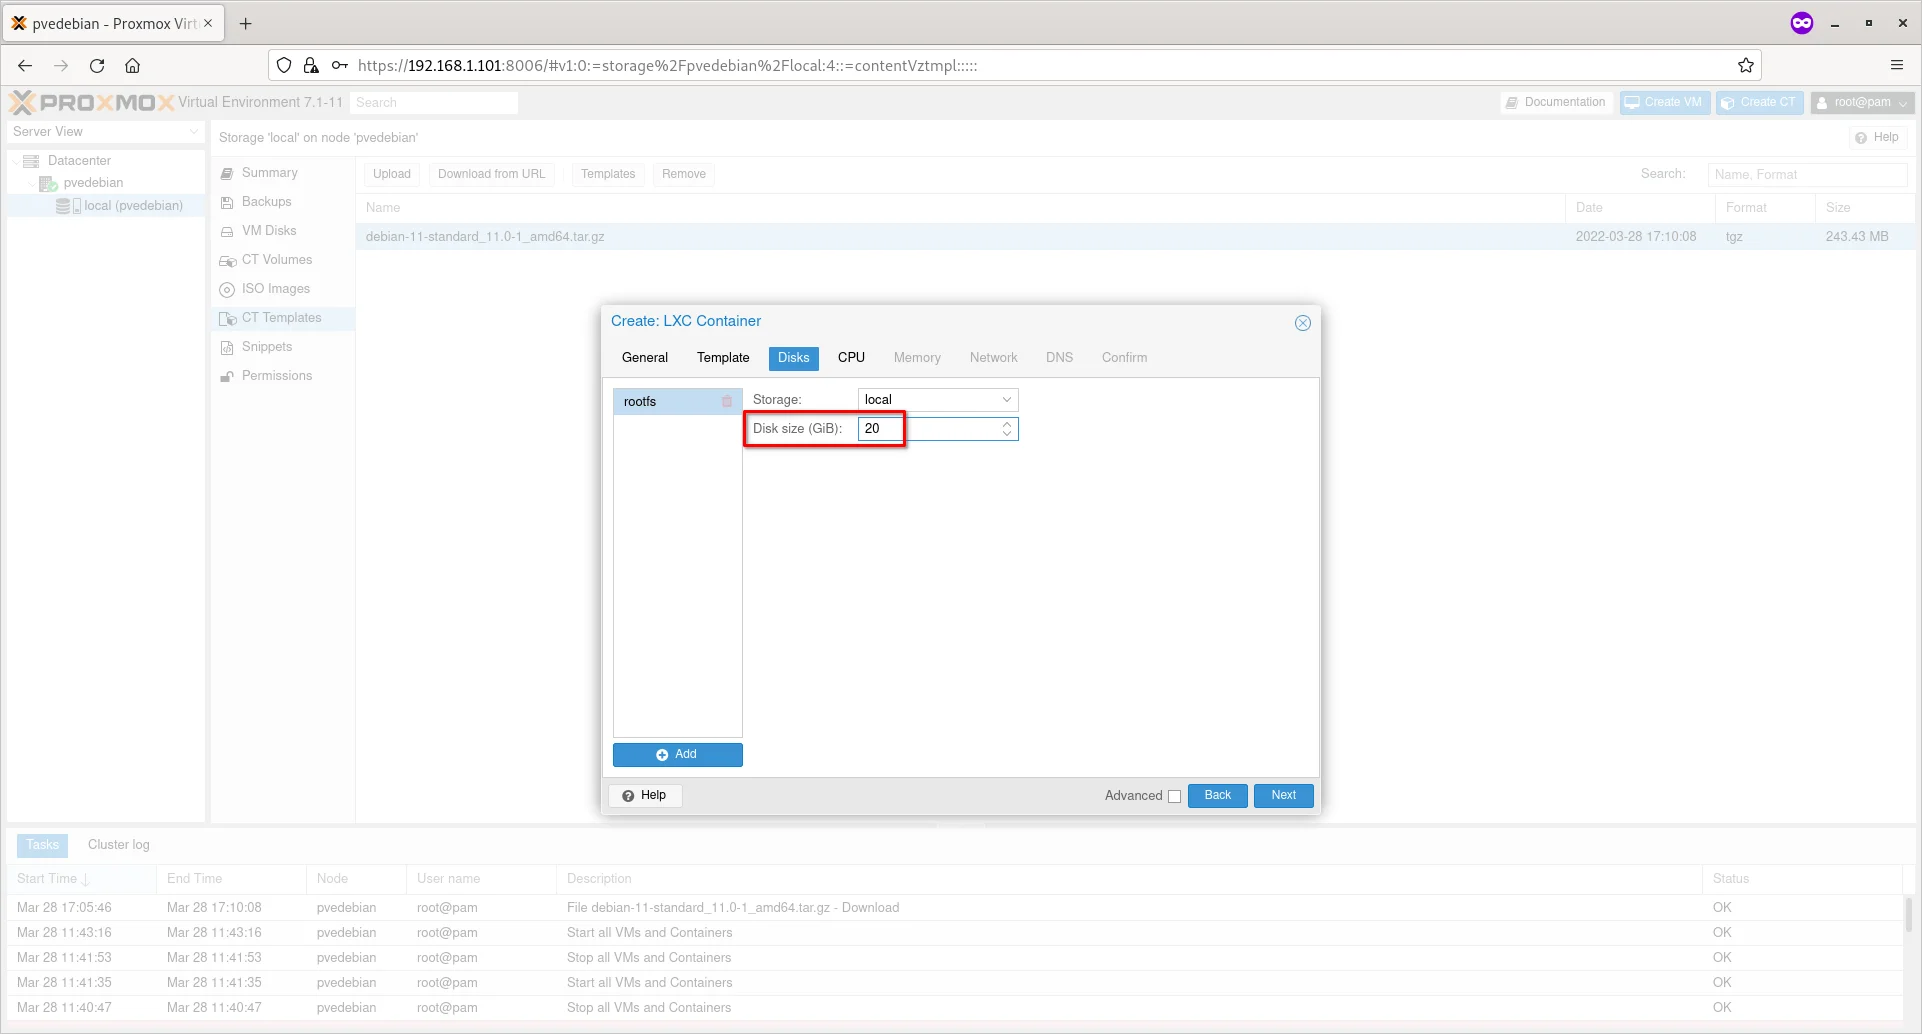
Enter Disk Size For Container

Choose the number of cores and click Next.
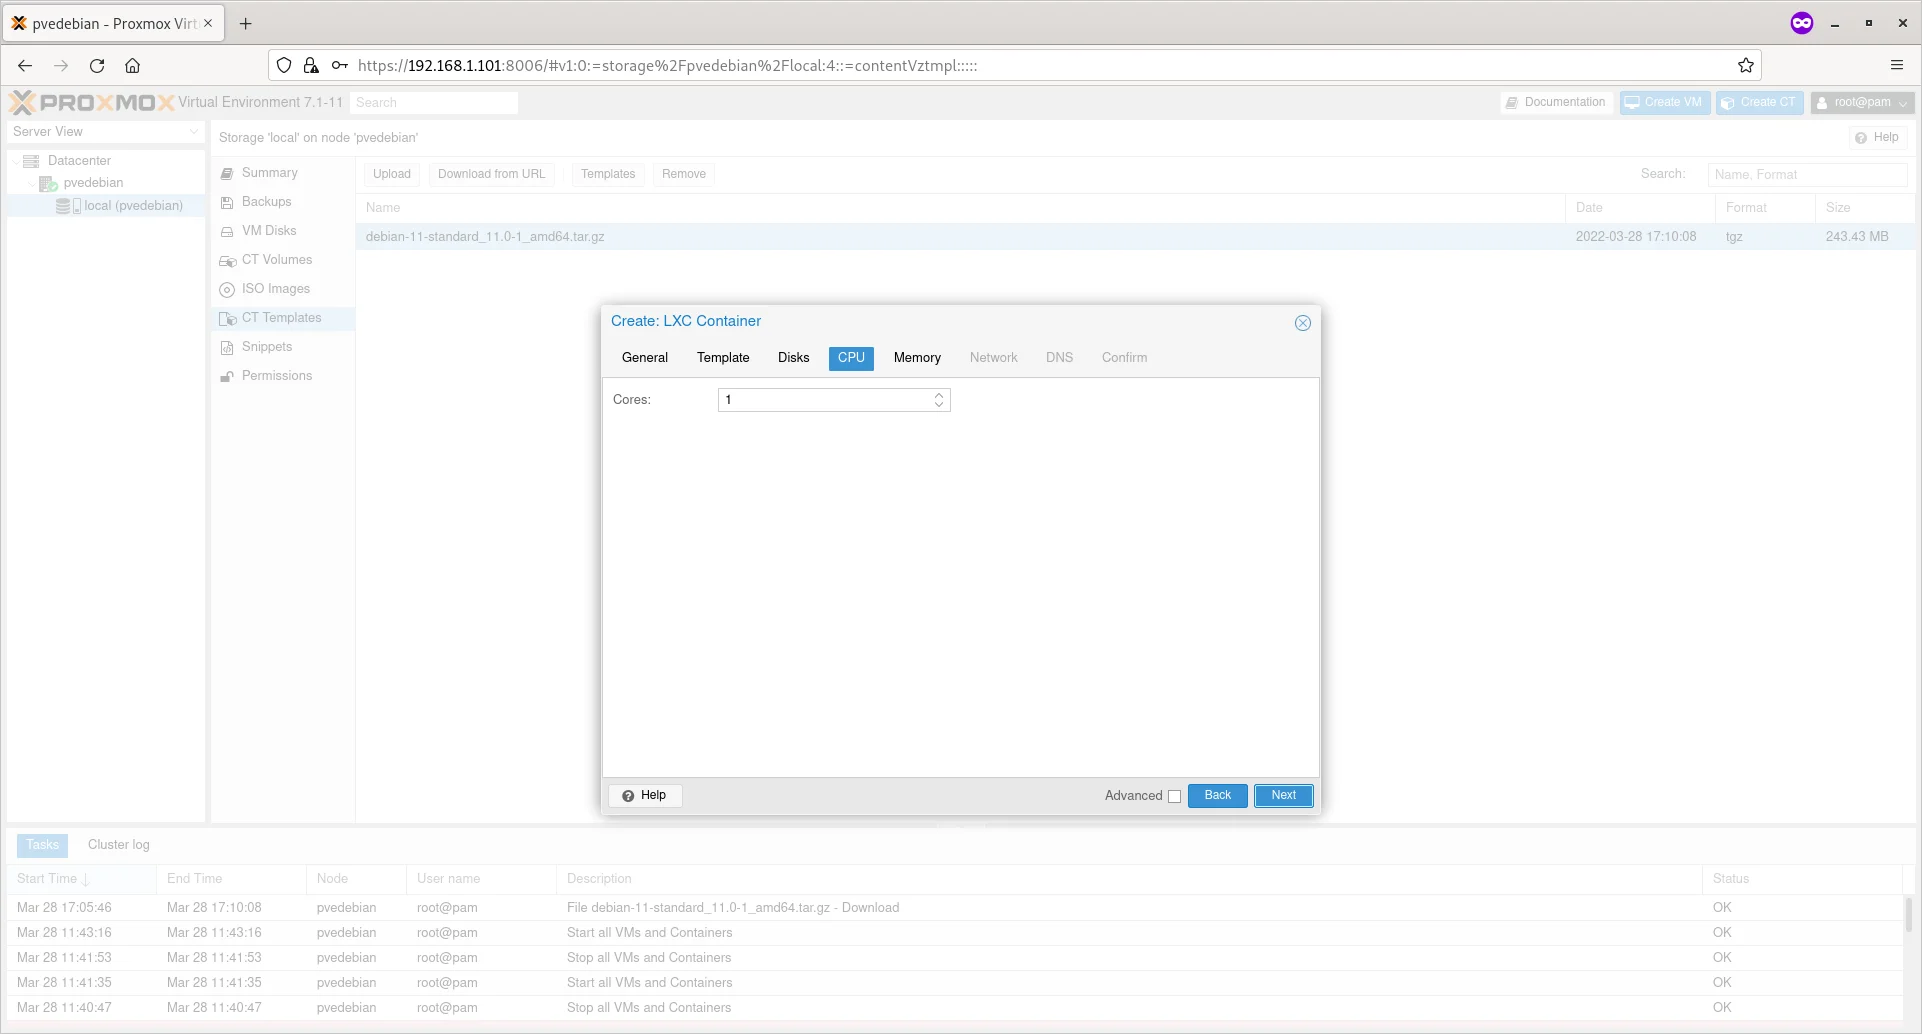
Enter Number Of Cores For Container

Enter the RAM size for your Container and click Next.
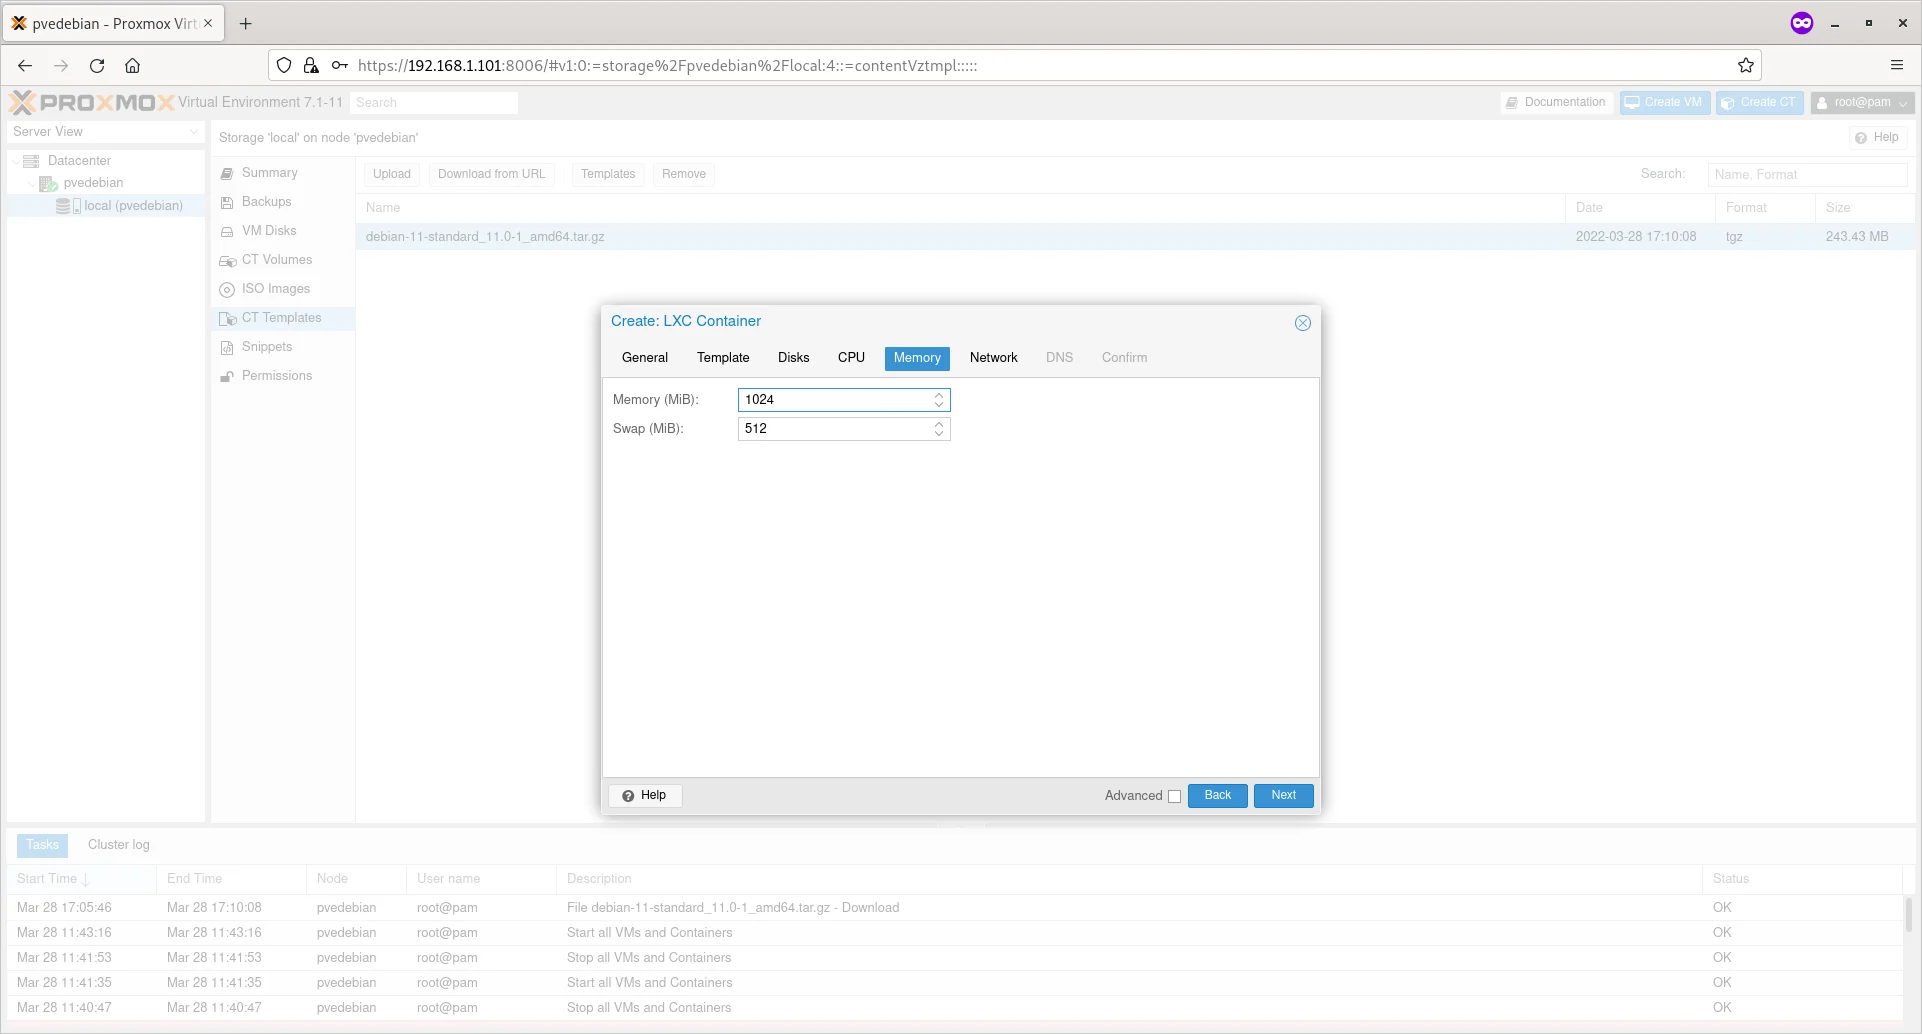
Enter RAM Size For Container

Enter the IP address and gateway for your container and click Next. Here, the gateway is optional. You can can enter gateway if you want to let the Container to talk to other Containers in the network.

Also, keep in mind that the gateway must be your network bridge’s (vmbr0) IP address and the IP address of the Container should be within the same subnet. For instance, if the IP address of the network bridge is 192.168.1.101, the IP address of the Container should be 192.168.1.x/24. Also you must mention the subnet mask along with the IP address (E.g. 192.168.1.15/24) as well.
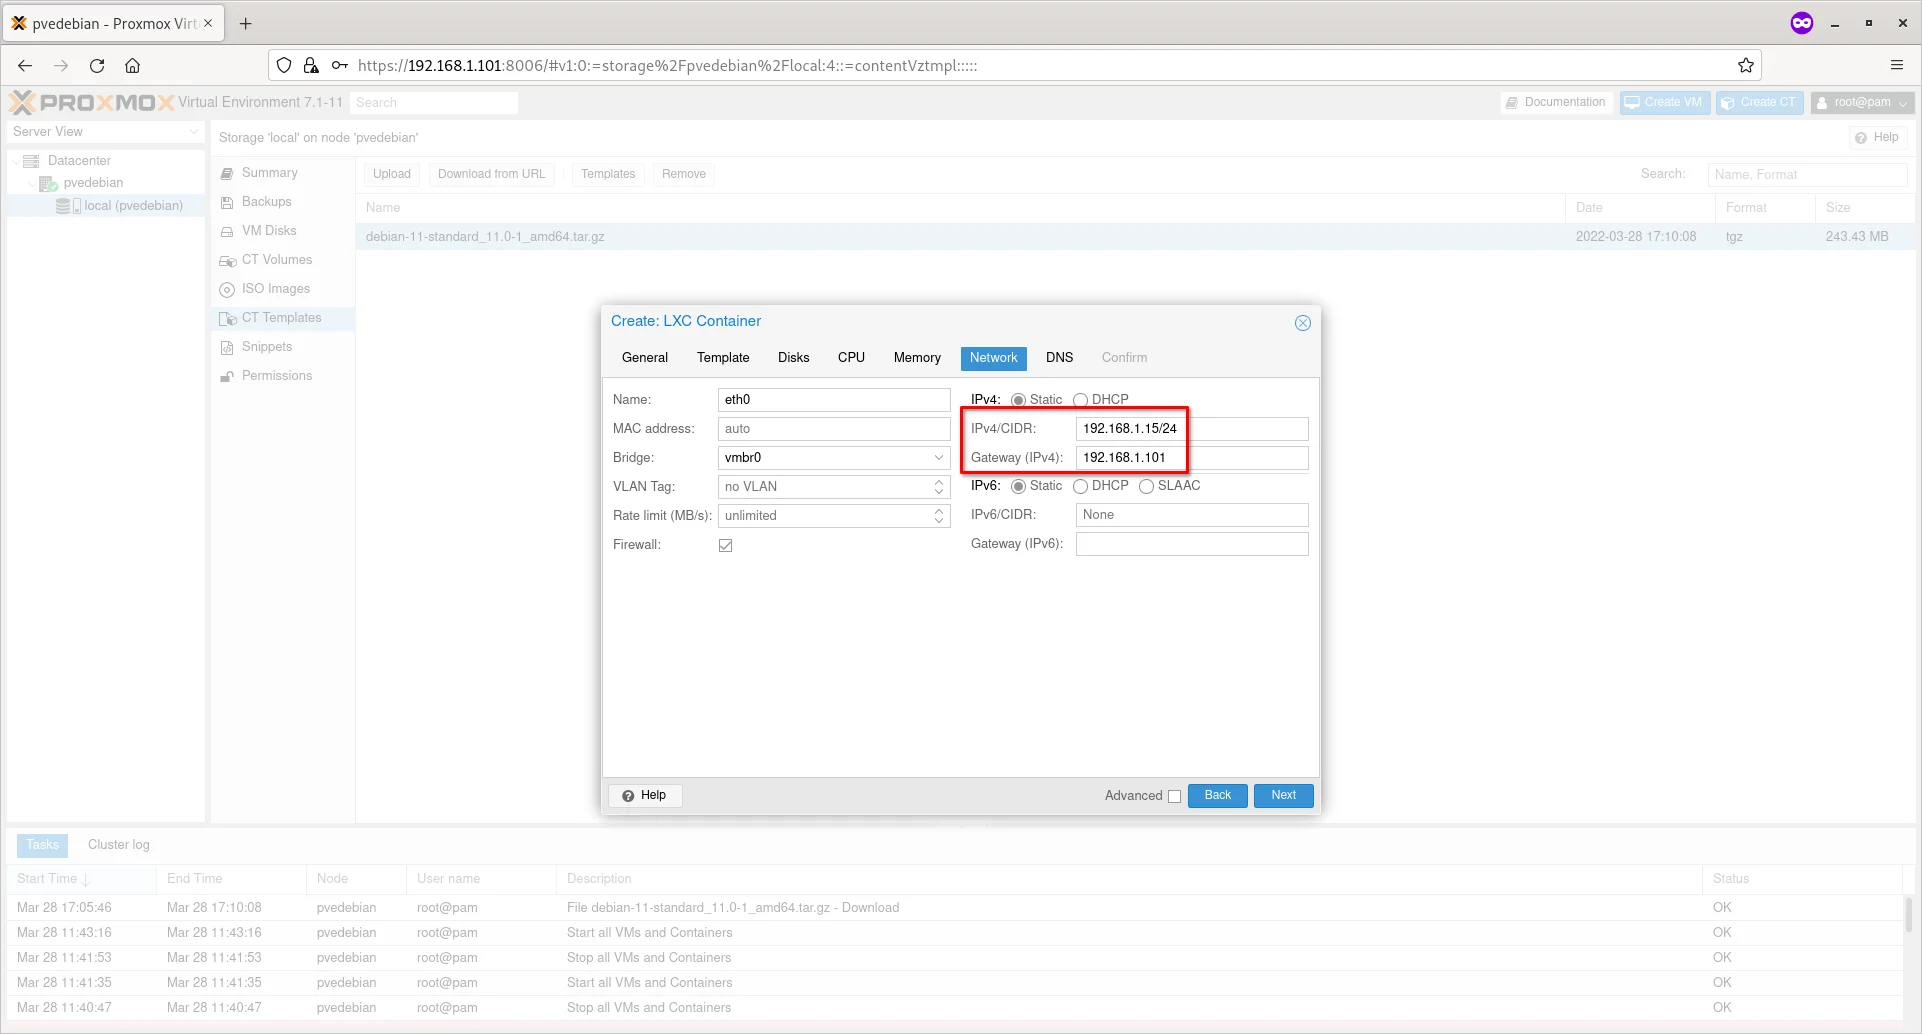
Enter IP Address And Gateway For Container

Enter the public DNS server (E.g. 8.8.8.8) if you want to let your container to connect to Internet. Make sure you have typed the DNS in the correct field.
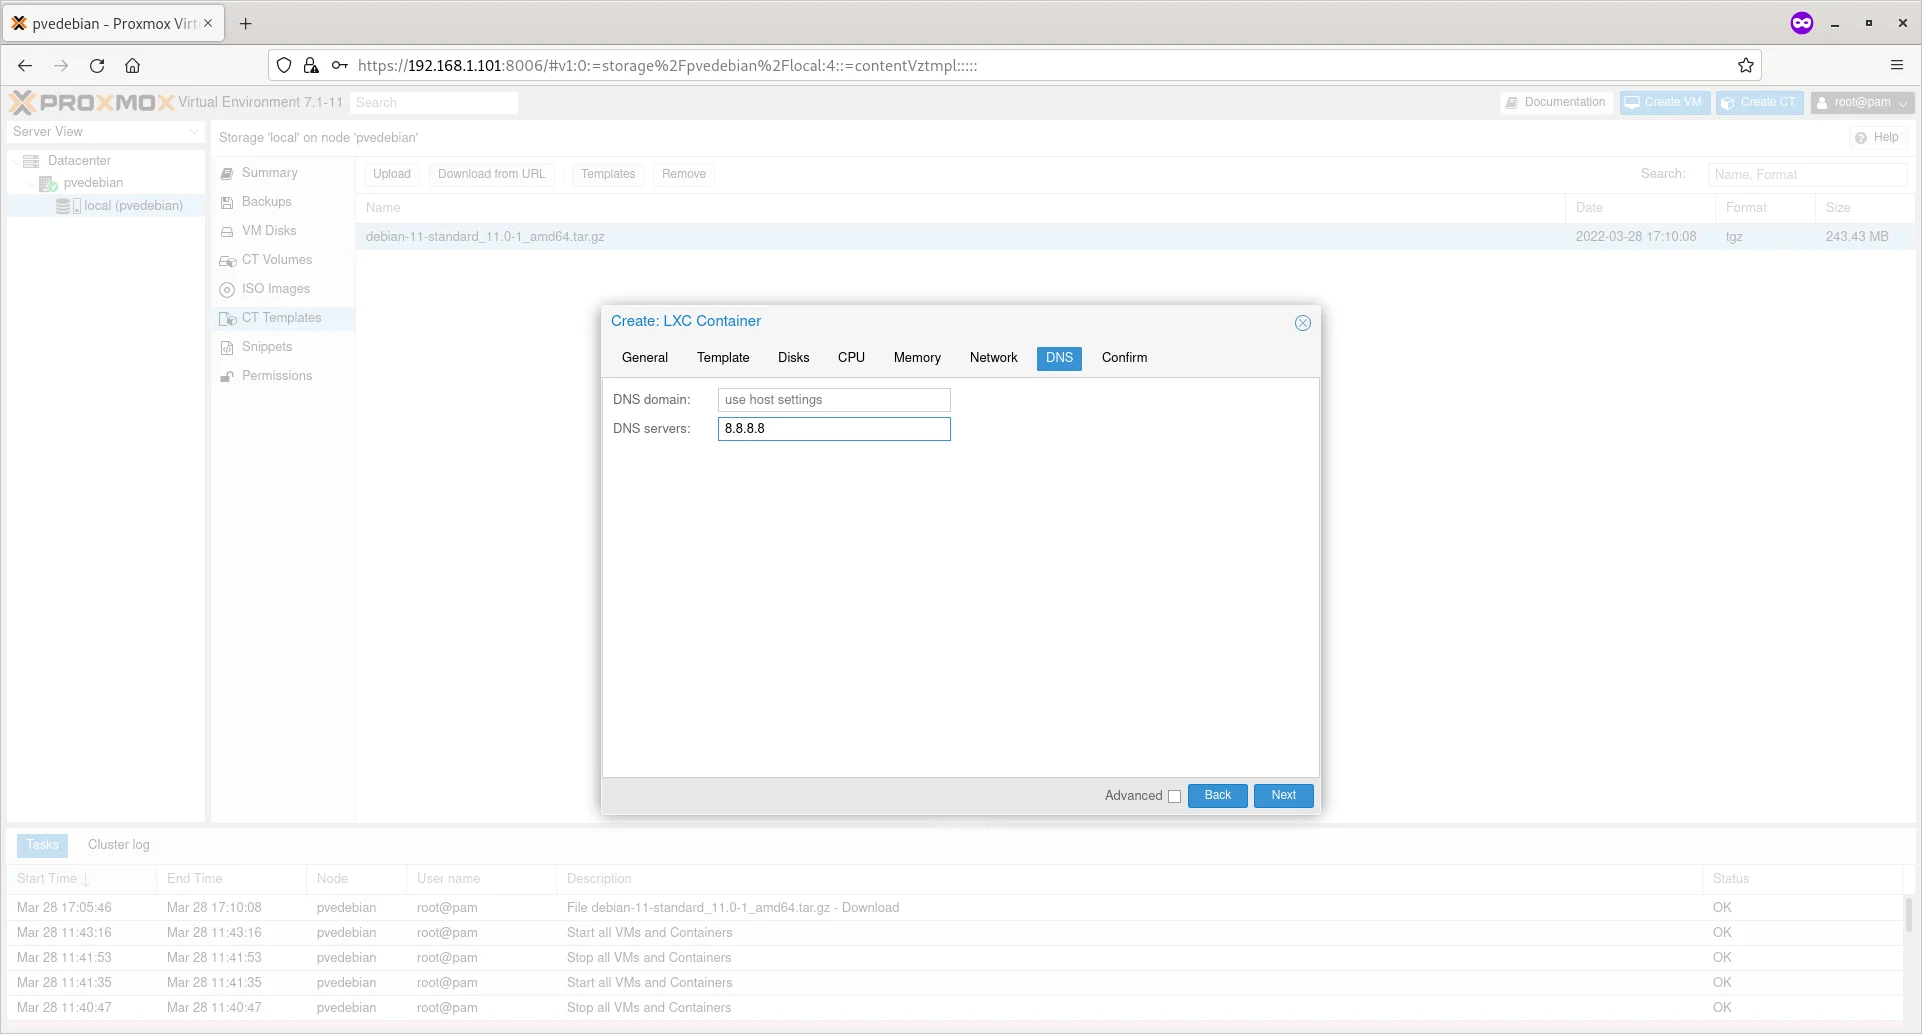
Enter DNS Server IP For Container

Review the settings/options and if you’re OK with it, click Finish button to create the Proxmox Container.
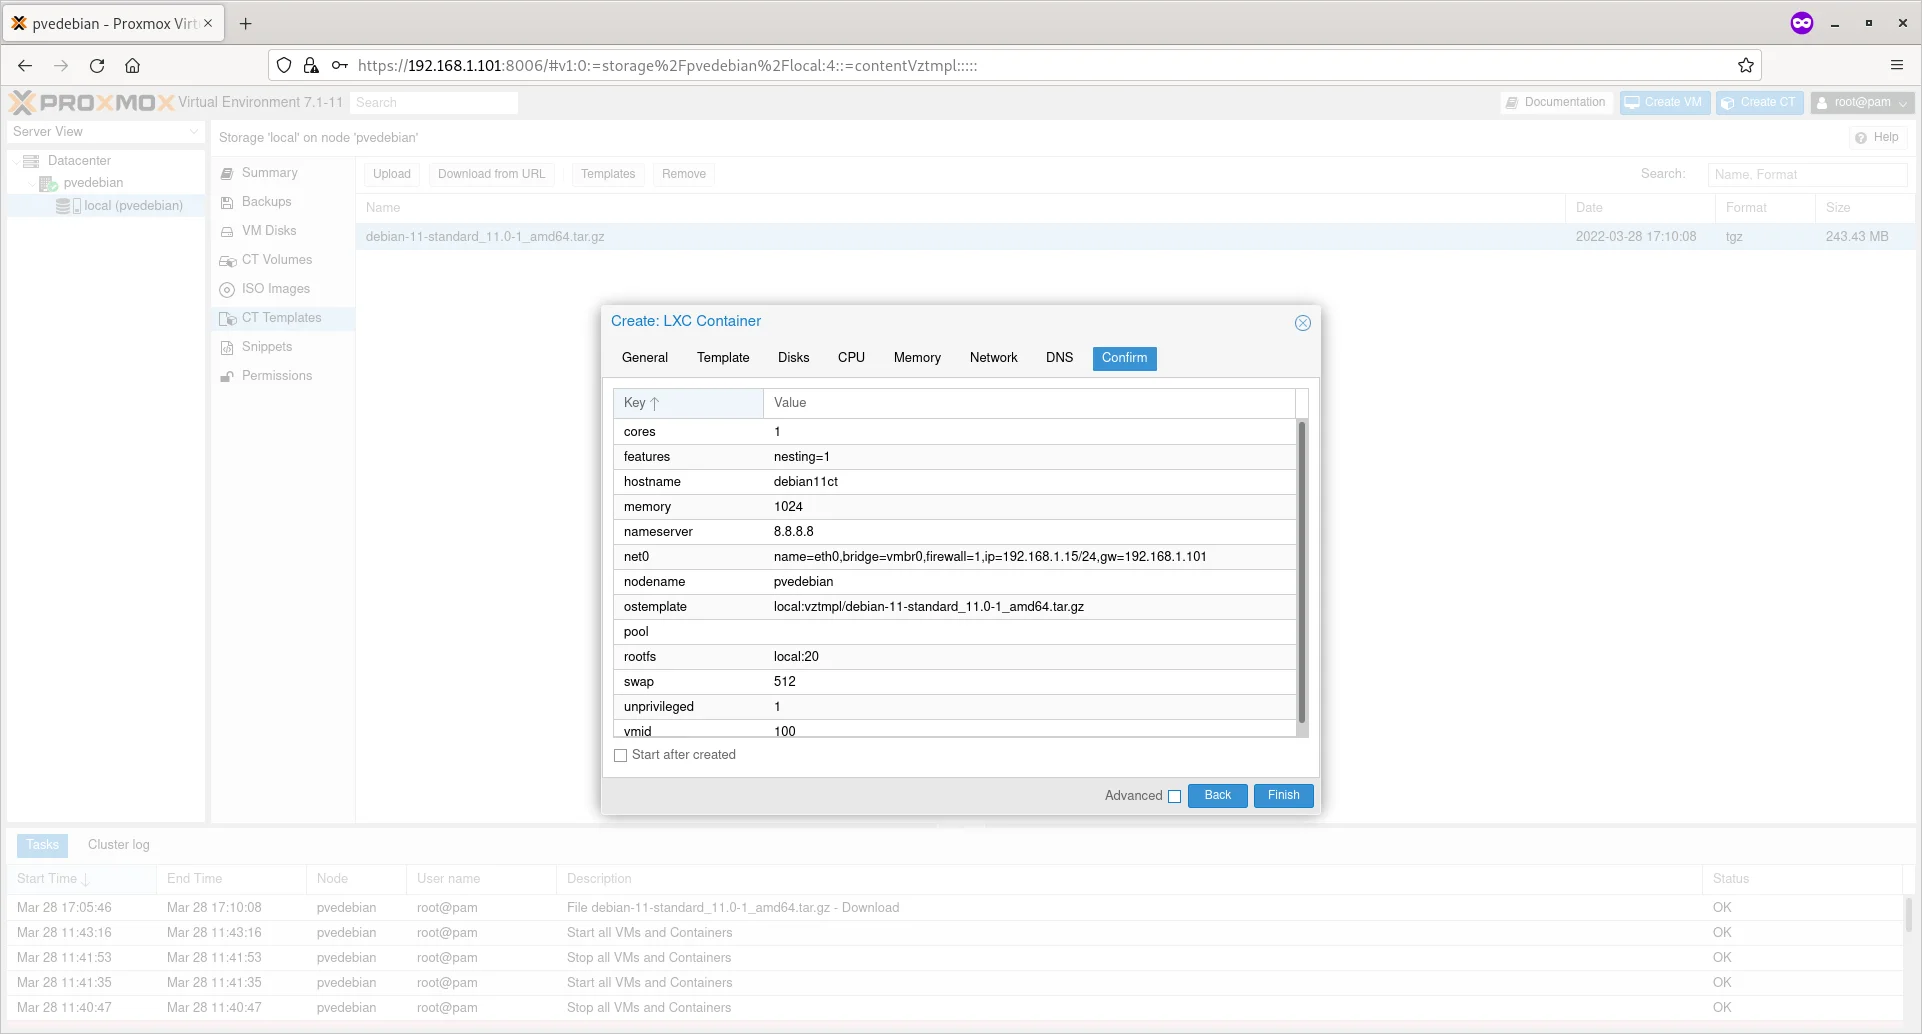
Review Container Settings

Upon successful container creation, you will the ‘TASK OK’ message in the output.
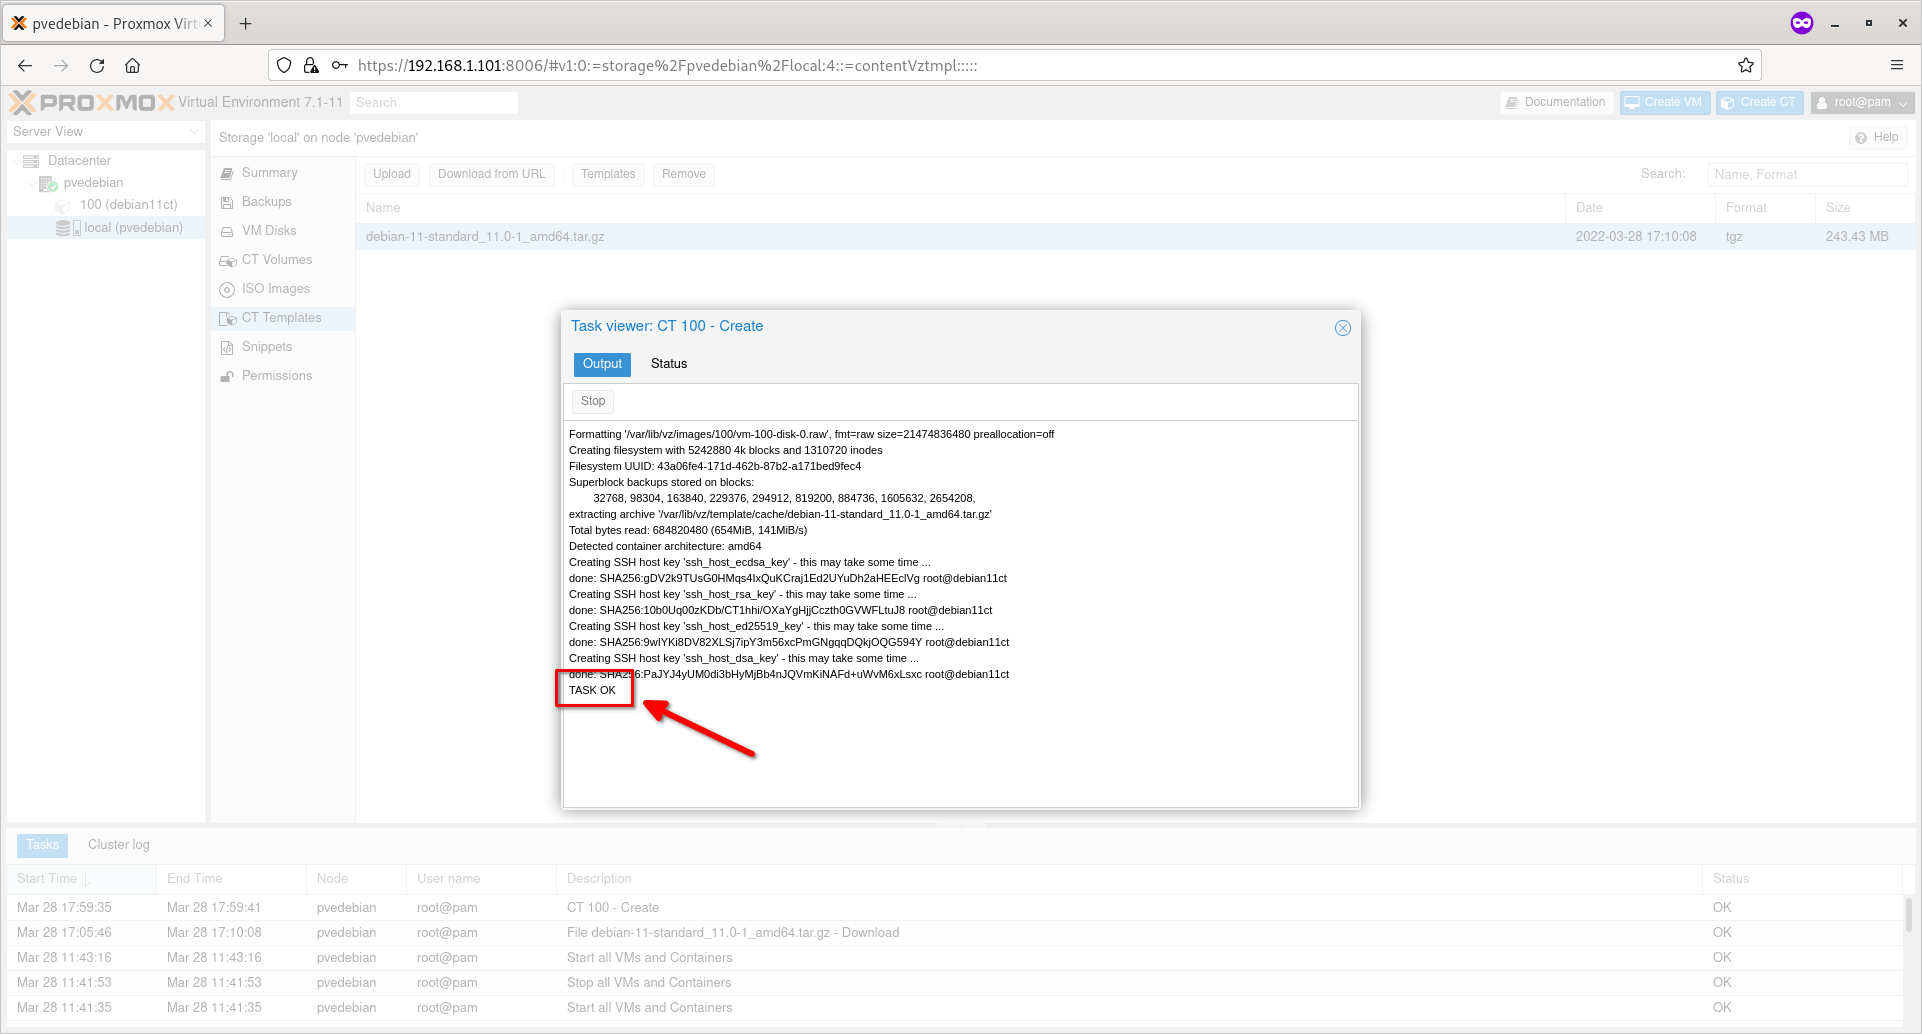
Proxmox Container Is Created Successfully

Close the dialog box and the newly created Proxmox container is listed under your Proxmox node on the left pane.

In the following screenshot, you see the container named ‘debian11ct’ with container ID ‘100’ under ‘pvedebian’ node.

Click on the Container to view the summary of it.
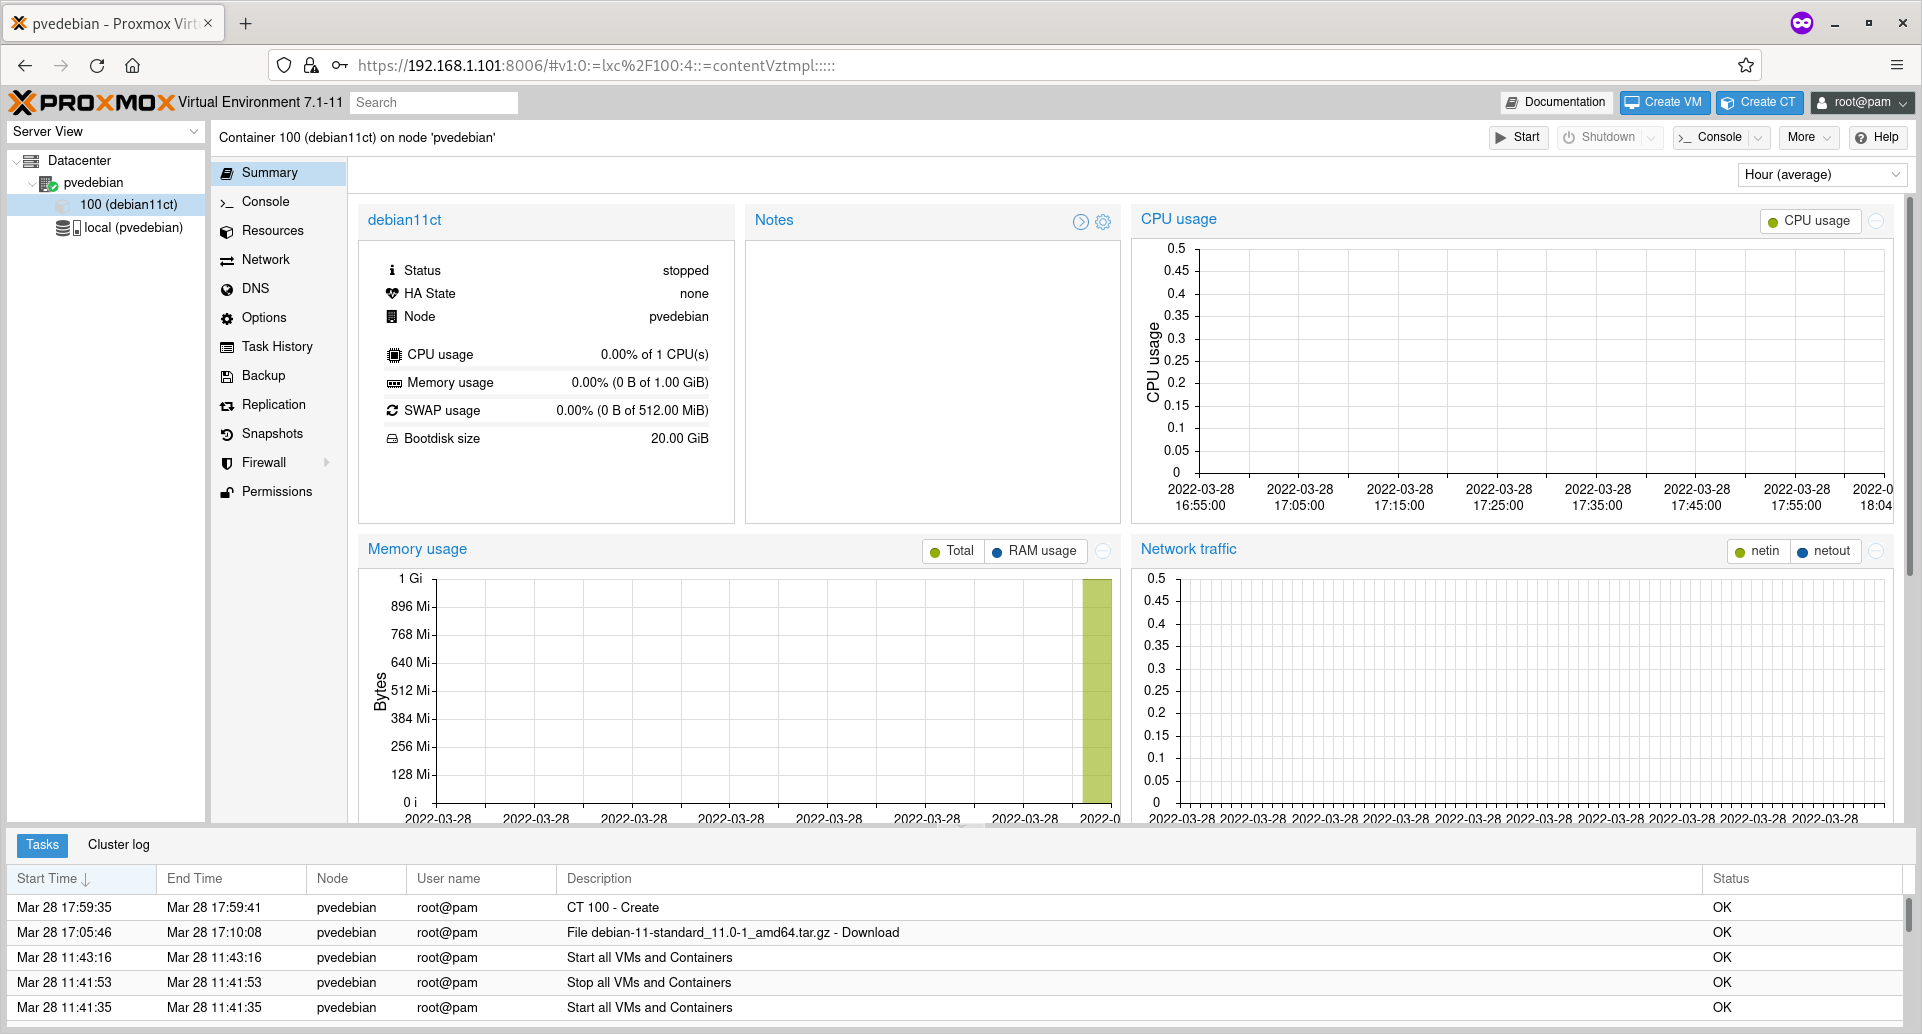
Container Summary
Container Summary

In the Summary section, you can view the Container’s uptime, cpu usage, memory usage, network traffic, and disk I/O etc.

You can also configure or change the various parameters (E.g. Access Console, Network, DNS, Firewall, Snapshot, Backup etc.) from the center pane.
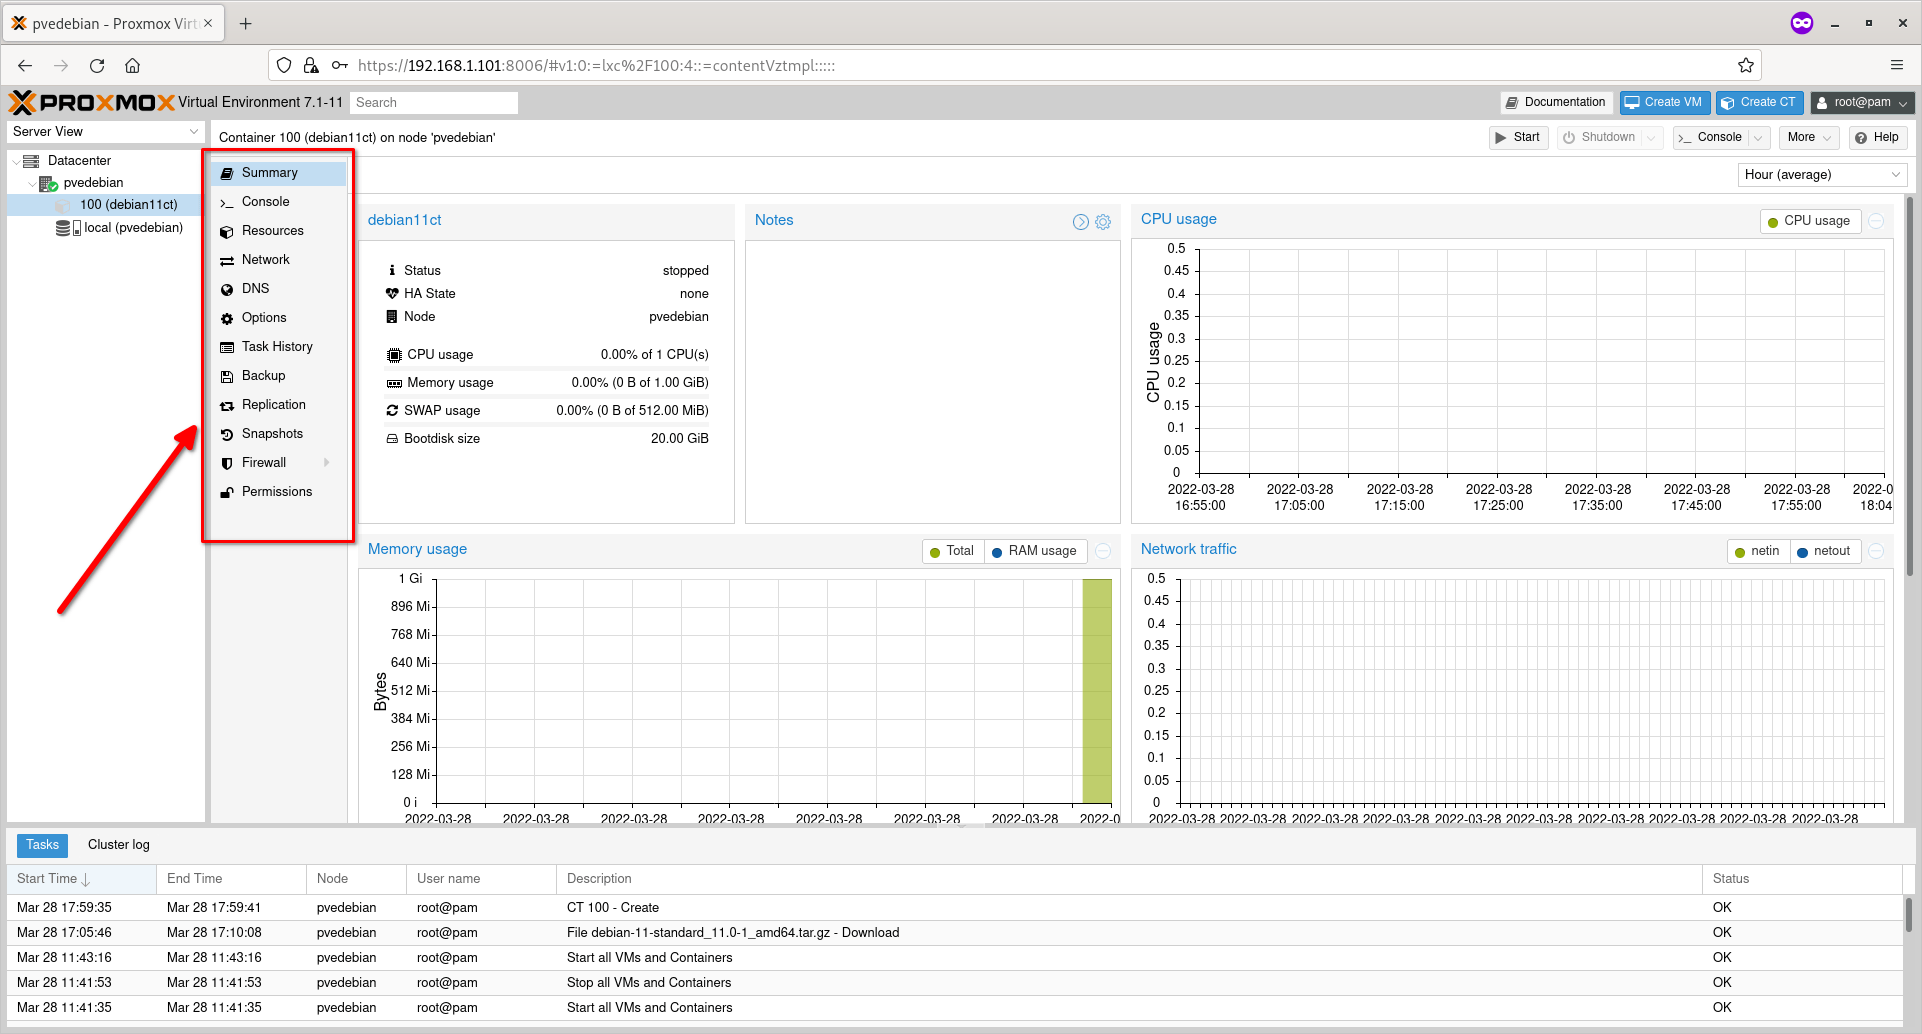
Configure Container Parameters

Step 4 – Start Containers

To start a Container, just click on its name and then click ‘Start’ button on the top right corner.
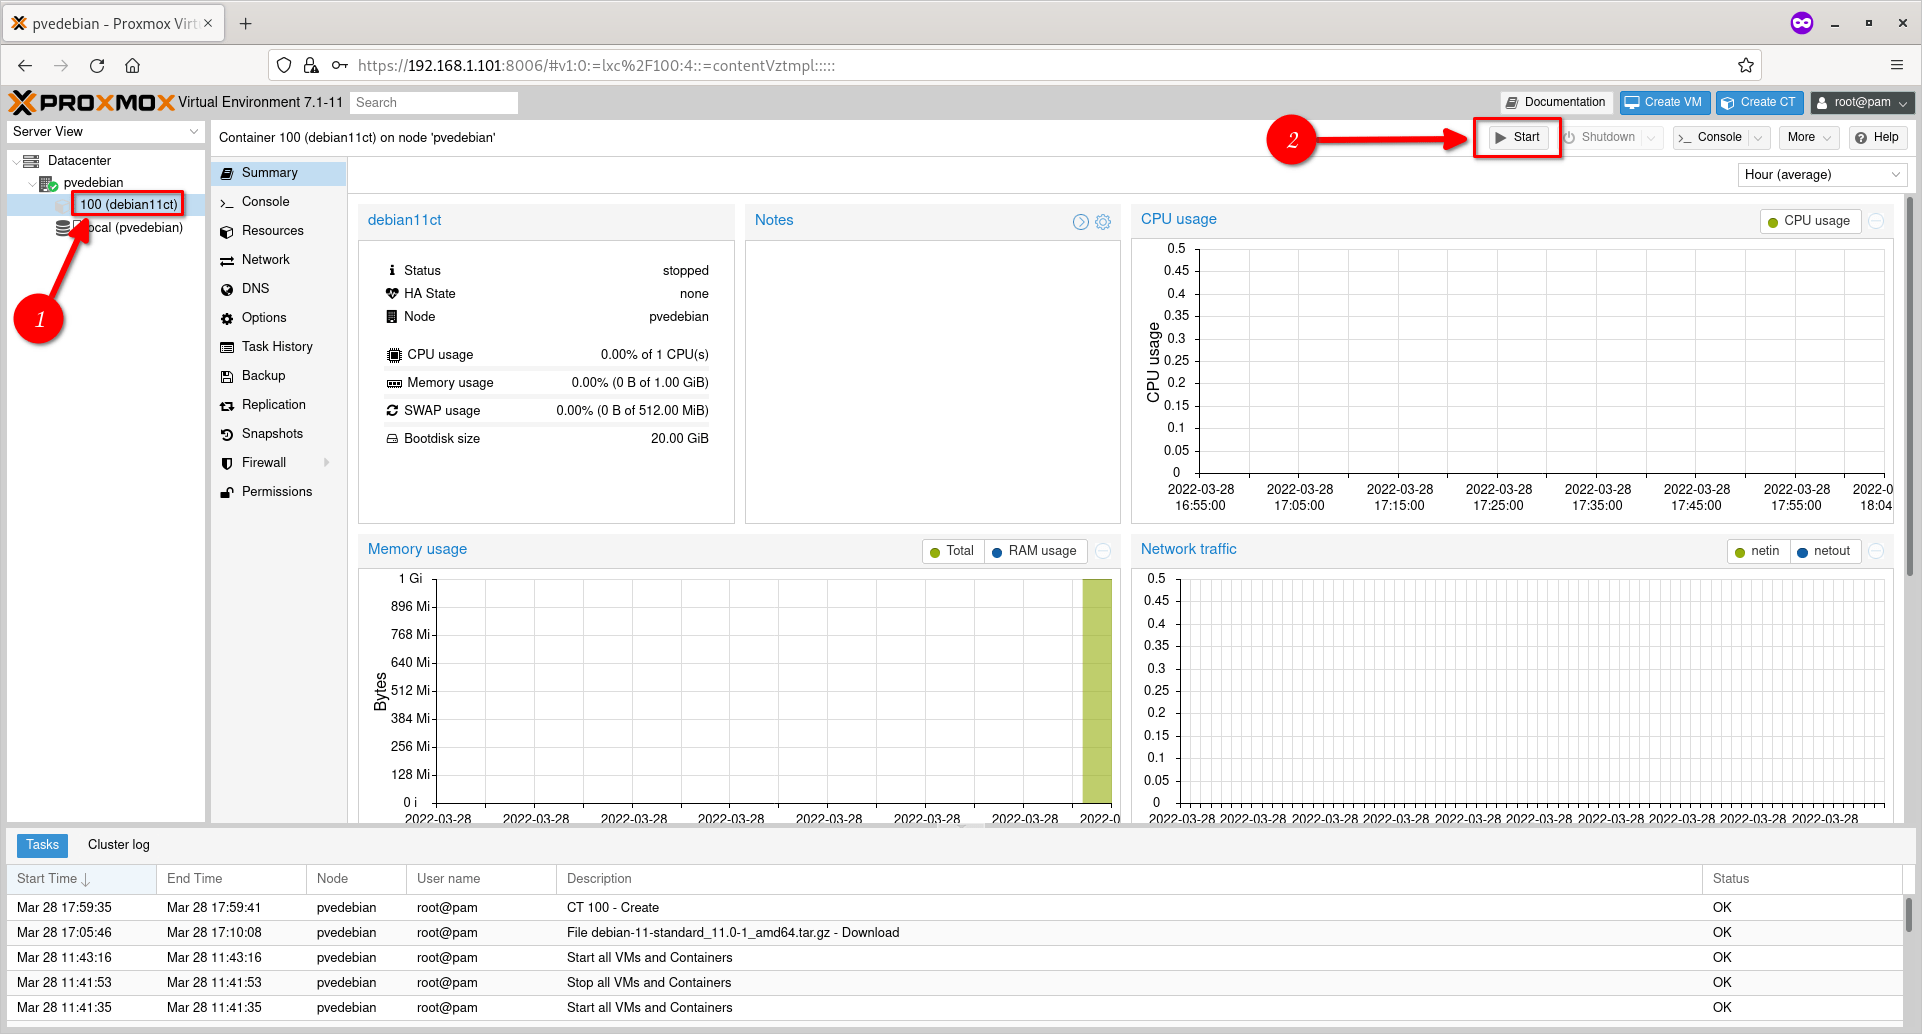
Start A Proxmox Container

Step 5 – Access Console Of Containers

To access the console screen of a running Container, click the ‘Console’ action button on the top right corner.
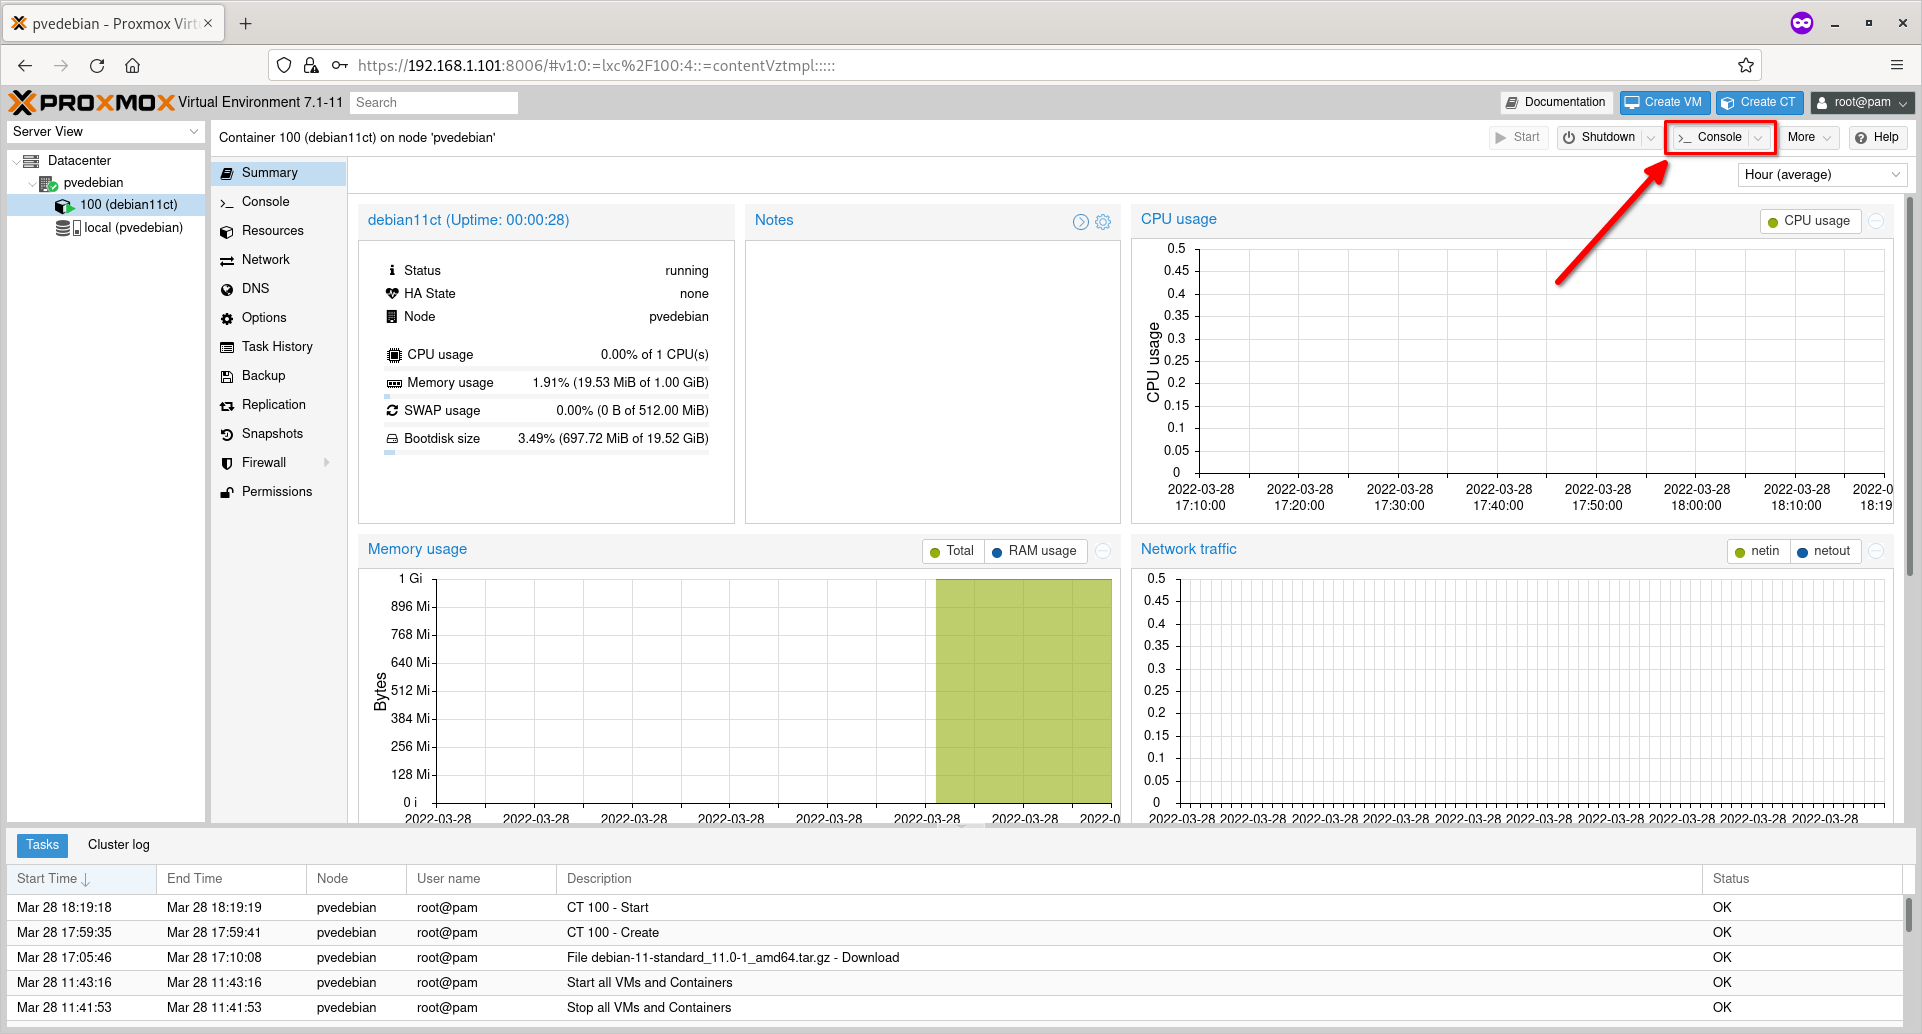
Access Proxmox Console

The console of the running Container will open in a separate browser window. Enter the user name (i.e. root) and its password to login to the Container’s console.
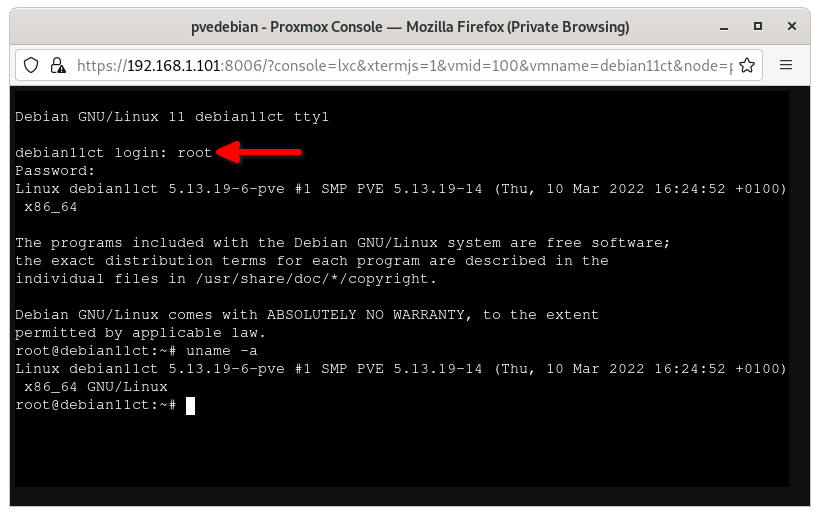
Proxmox Container Console

Even if you close this browser window, the Container remains running in the background.

Did you notice the output of uname command in the above screenshot? It shows the same Kernel version of the Proxmox host, because Containers user the same underlying Kernel of the Proxmox hosts.

Step 6 – Shutdown/Reboot/Stop Containers

You can shutdown or reboot or pause/resume a running container using the respective action buttons on the top.
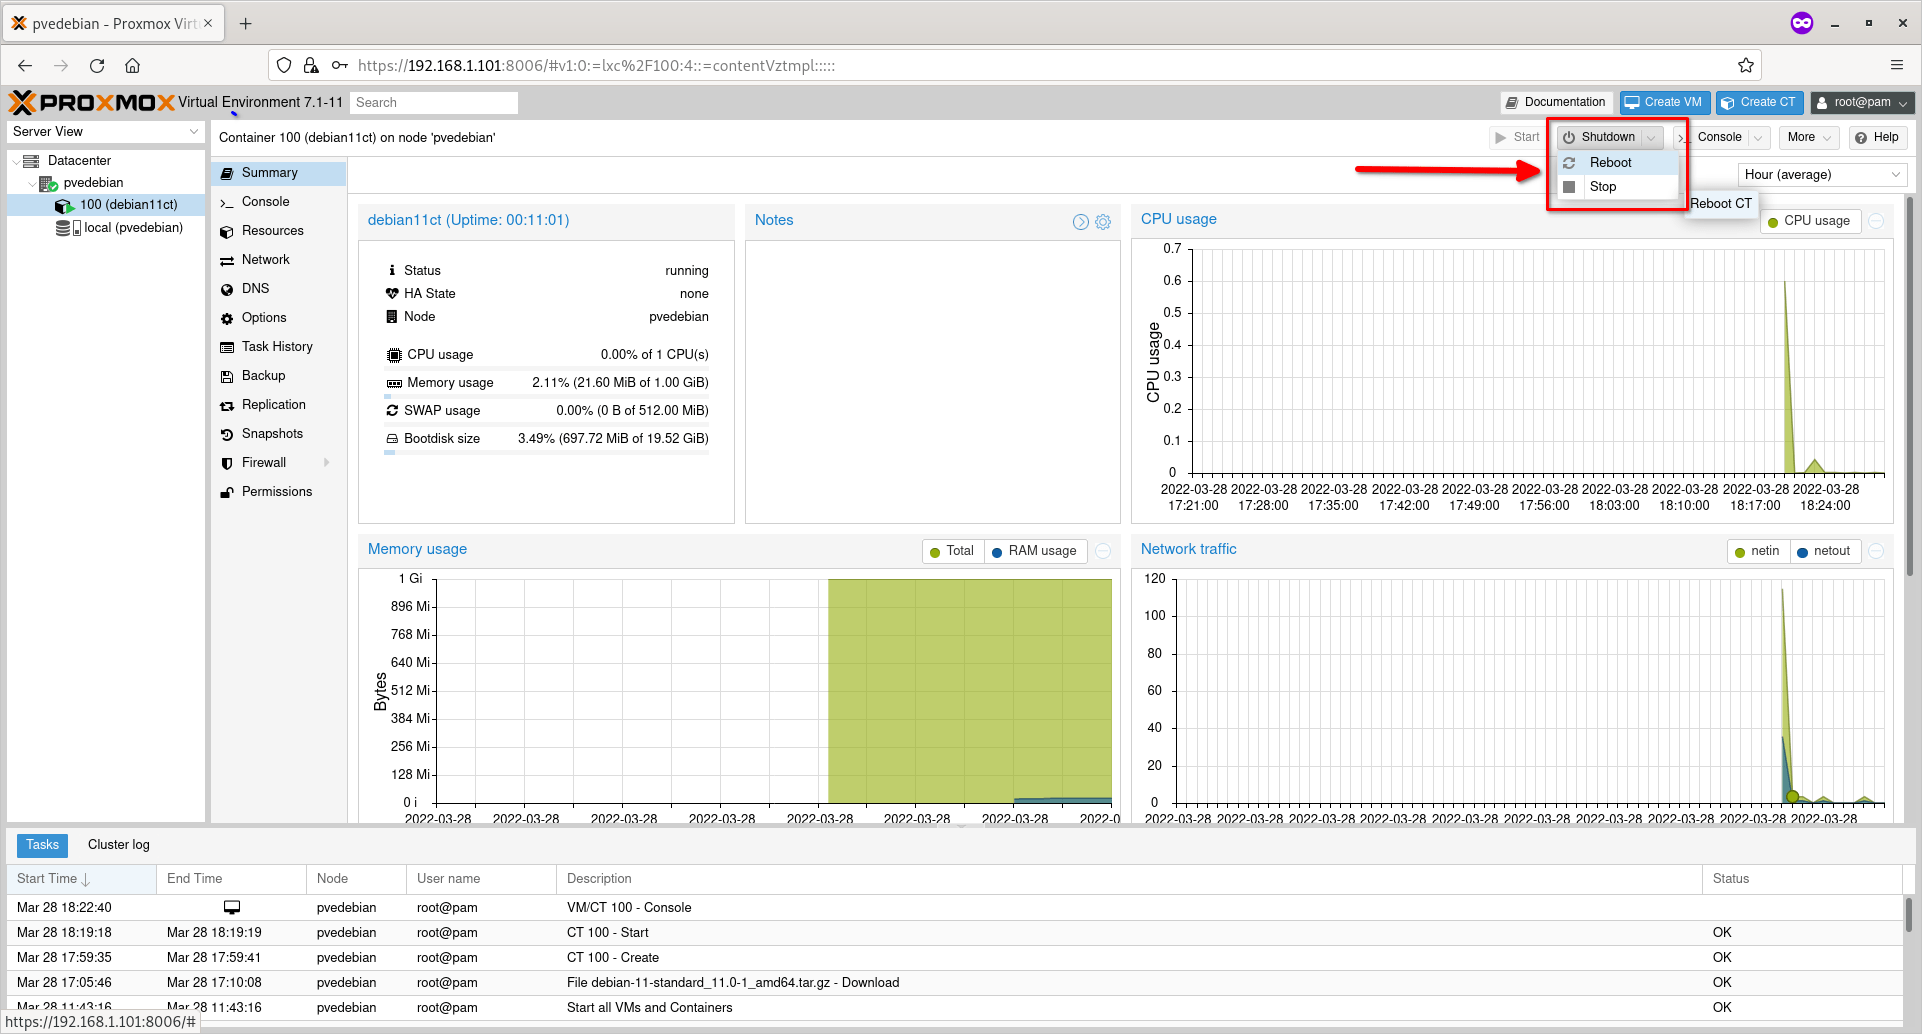
Shutdown, Reboot, Stop Container

Step 7 – Clone Containers

Shutdown the Container if it is running. Click on the ‘More’ drop-down action button on the top and then choose ‘Clone’ option to clone the Container.
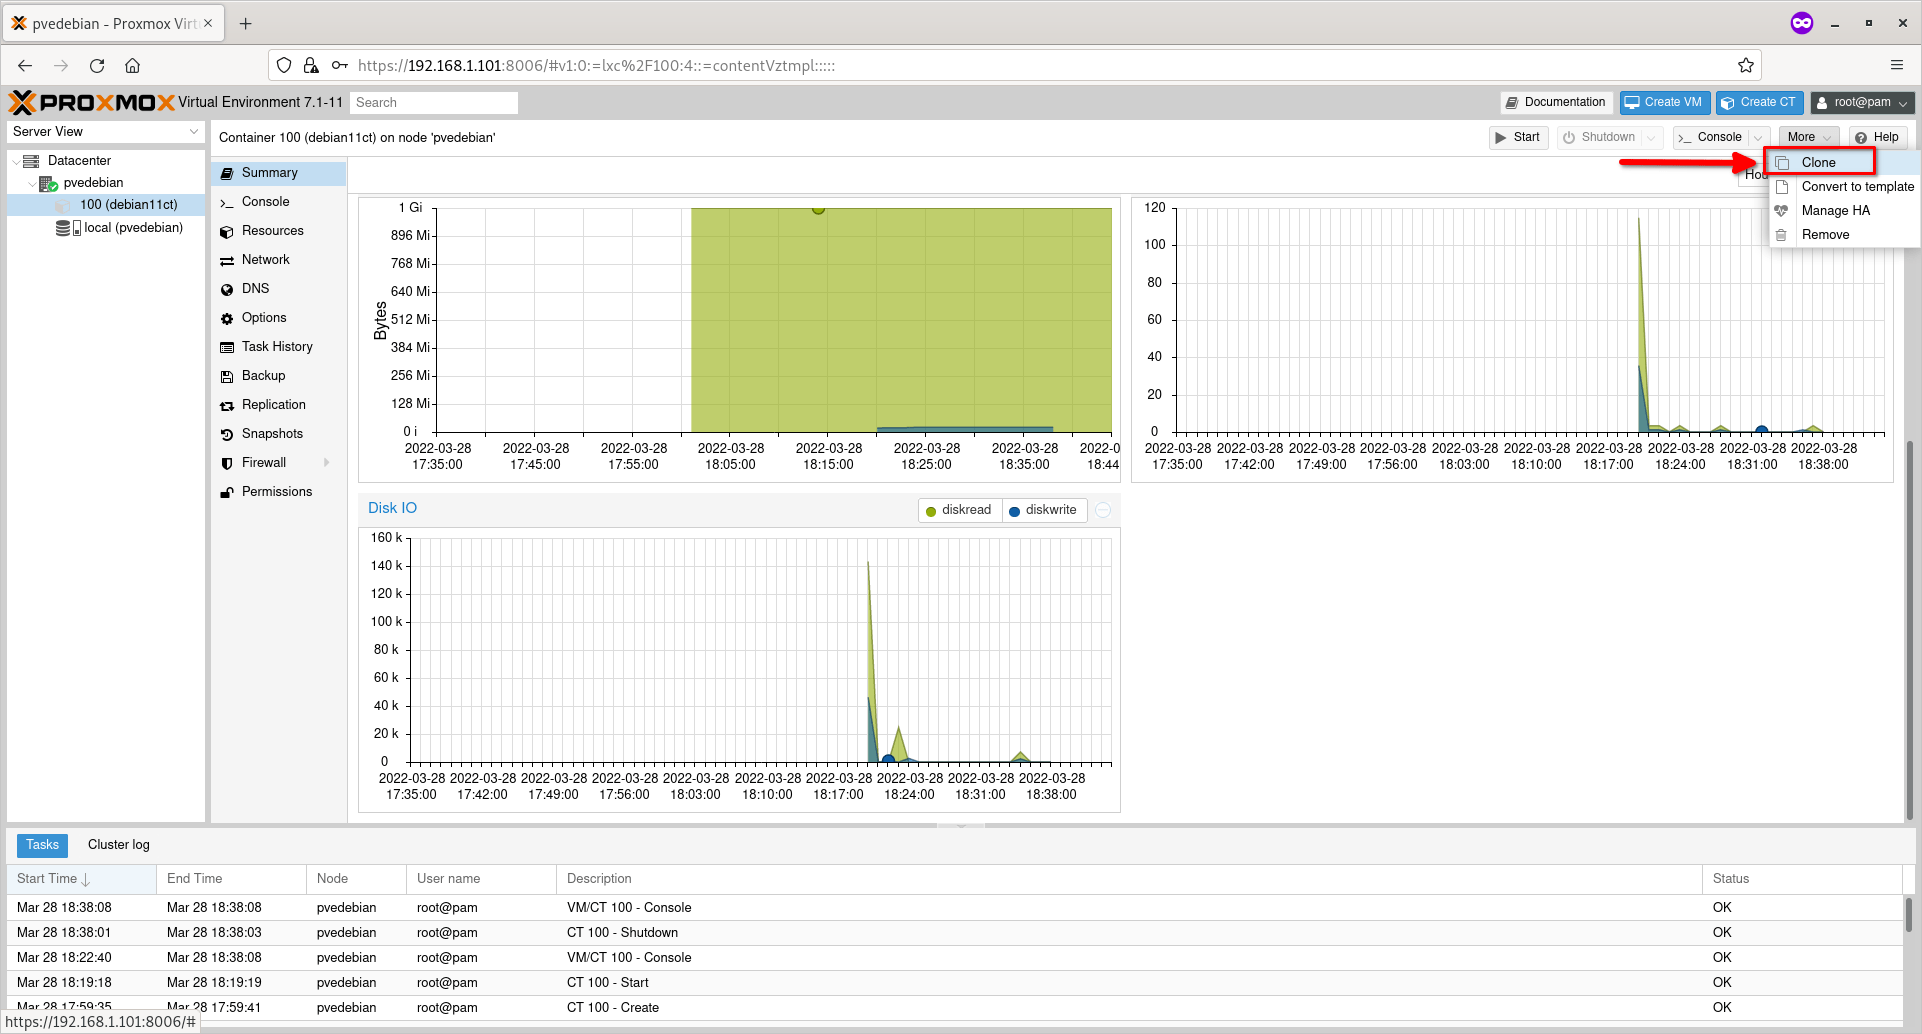
Clone Container
Clone Container

Enter the name to the clone, choose the target storage location. Leave as is if you want to save it in the default location. Click Clone button to start cloning.
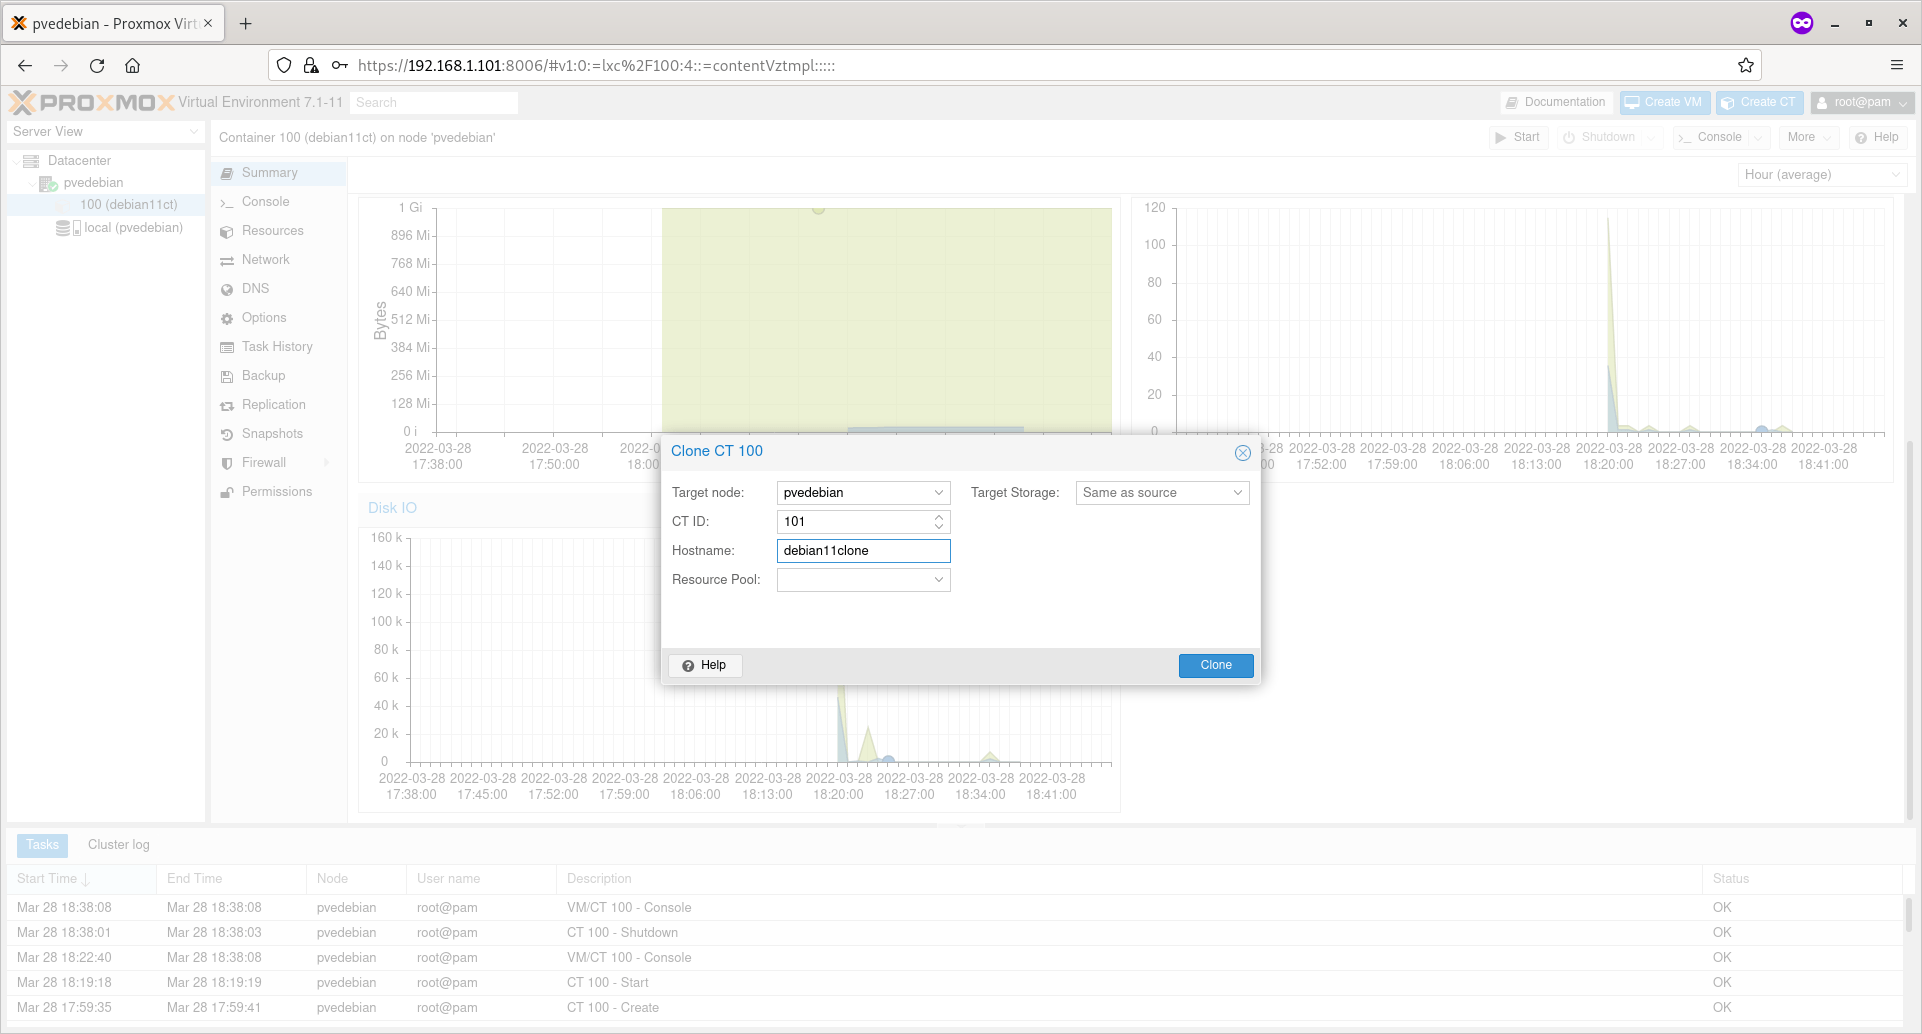
Enter Cloned Container Details

Step 8 – Remove Containers

First, make sure the container is powered off. Click on the ‘More’ drop-down button and choose ‘Remove’ option to delete the Container.
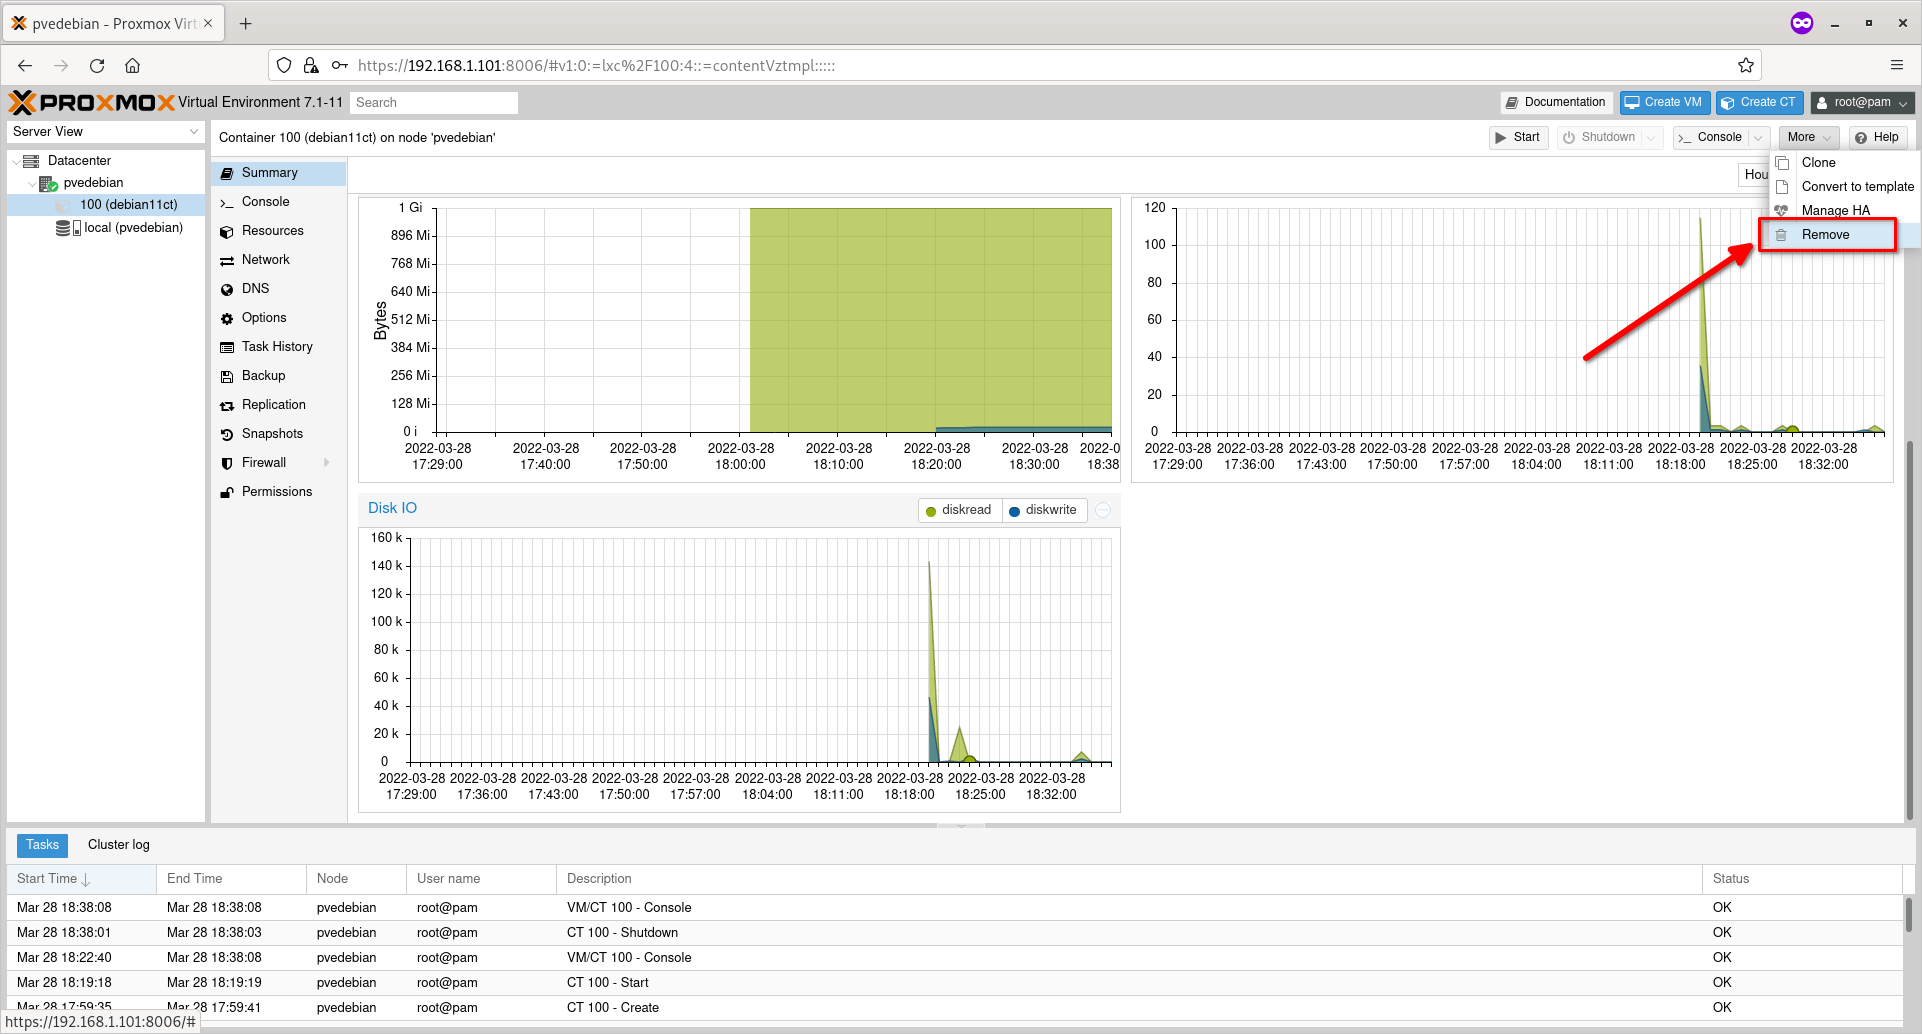
Remove Container
Remove Container

Conclusion

In this comprehensive guide, we have discussed how to create Proxmox containers from Proxmox Web user interface. We also looked at how to do basic container management actions such as starting, stopping, deleting and cloning Containers.

Reverting Thin-LVM to “old” Behavior of /var/lib/vz (Proxmox 4.2 and later)

If you installed Proxmox 4.2 (or later), you see yourself confronted with a changed layout of your data. There is no mounted /var/lib/vz LVM volume anymore, instead you find a thin-provisioned volume. This is technically the right choice, but one sometimes want to get the old behavior back, which is described here. This section describes the steps to revert to the “old” layout on a freshly installed Proxmox 4.2:

  • After the Installation your storage configuration in /etc/pve/storage.cfg will look like this:
dir: local
        path /var/lib/vz
        content iso,vztmpl,backup

lvmthin: local-lvm
        thinpool data
        vgname pve
        content rootdir,images
  • You can delete the thin-volume via GUI or manually and have to set the local directory to store images and container aswell. You should have such a config in the end:
dir: local
        path /var/lib/vz
        maxfiles 0
        content backup,iso,vztmpl,rootdir,images
  • Now you need to recreate /var/lib/vz
root@pve-42 ~ > lvs
  LV   VG   Attr       LSize  Pool Origin Data%  Meta%  Move Log Cpy%Sync Convert
  data pve  twi-a-tz-- 16.38g             0.00   0.49
  root pve  -wi-ao----  7.75g
  swap pve  -wi-ao----  3.88g

root@pve-42 ~ > lvremove pve/data
Do you really want to remove active logical volume data? [y/n]: y
  Logical volume "data" successfully removed

root@pve-42 ~ > lvcreate --name data -l +100%FREE pve
  Logical volume "data" created.

root@pve-42 ~ > mkfs.ext4 /dev/pve/data
mke2fs 1.42.12 (29-Aug-2014)
Discarding device blocks: done
Creating filesystem with 5307392 4k blocks and 1327104 inodes
Filesystem UUID: 310d346a-de4e-48ae-83d0-4119088af2e3
Superblock backups stored on blocks:
        32768, 98304, 163840, 229376, 294912, 819200, 884736, 1605632, 2654208,
        4096000

Allocating group tables: done
Writing inode tables: done
Creating journal (32768 blocks): done
Writing superblocks and filesystem accounting information: done
  • Then add the new volume in your /etc/fstab:
/dev/pve/data /var/lib/vz ext4 defaults 0 1
  • Restart to check if everything survives a reboot.

You should end up with a working “old-style” configuration where you “see” your files as it was before Proxmox 4.2

Enable Proxmox No-subscription Repository

You don’t need a license key to use the Proxmox No-subscription repository. It is suitable for home labs users, testing purpose and non-production use.

To enable Proxmox No-subscription repository, edit /etc/apt/sources.list file:

# nano /etc/apt/sources.list

And add the following lines:

deb http://ftp.debian.org/debian bullseye main contrib

deb http://ftp.debian.org/debian bullseye-updates main contrib

# security updates
deb http://security.debian.org bullseye-security main contrib

# PVE pve-no-subscription repository provided by proxmox.com,
# NOT recommended for production use
deb http://download.proxmox.com/debian/pve bullseye pve-no-subscription

Finally, update the repository list:

$ sudo apt update

$ apt full-upgrade